This page describes how to set up the Experlogix Smart Flows connector for Microsoft Dynamics 365 CE. The connector enables Smart Flows to securely connect to CE to retrieve and update business data through the Dataverse, trigger flows that generate documents and perform document-related actions in the context of your Dynamics 365 CE records.
The following are explained in this topic:
-
How to configure the connector for the different Microsoft Dynamics 365 CE deployment types
-
How to make Smart Flows capabilities available to Dynamics 365 CE users within their day-to-day workflows
Connector in a nutshell
| Parameters | Details |
|---|---|
| Connector name | Microsoft Dynamics 365 CE |
| License | Requires Plugin for Microsoft Dynamics 365 CE |
| Required version of Smart Flows | 4.0+ |
| Max number per project | 1 |
| Available for Single Sign-On | Yes |
| Support for Individual User Authentication | Yes |
| Supported authentication patterns |
|
| Plugin App |
|
| Plugin App Certified | Yes |
| Plugin App Installation |
|
| Scope |
|
Microsoft Dynamics 365 CE Connector Creation
| 1. | In the Project Console, navigate to Control panel > Connectors. |
| 2. | Select the +Create. |
The Create connector dialog box is displayed.

| 3. | In the Name field, input the name of your connector. |
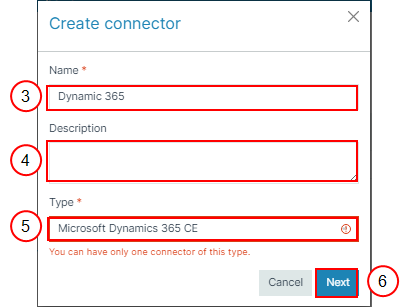
| 4. | (Optional) In the Description field, input a description for your connector. |
| 5. | In the Type dropdown menu, select Microsoft Dynamics 365 CE. |
| 6. | Select Next. |
The Create Connector URL window displays.
The following steps provide additional configuration guidance.
Part 1 - Smart Flows authorization for Microsoft Dynamics 365 CE instance connection
Establishing a connection between Smart Flows and Microsoft Dynamics 365 CE requires authorization of Smart Flows. This connection establishment heavily depends on where your Microsoft Dynamics 365 CE instance is deployed (Online or On-premise) and where your Experlogix Smart Flows project is deployed (Shared/Private Cloud or On-premise).
There are four possible combinations, each with its own authorization path. Assess your situation and choose the right option:
| Smart Flows Deployment | Microsoft Dynamics 365 CE Online | Microsoft Dynamics 365 CE On-premise |
|---|---|---|
| Experlogix Smart Flows Shared or Private Cloud | OAuth (simplified flow) |
|
| Experlogix Smart Flows On-premise | OAuth with custom app registration in Entra ID |
|
Option 1: Authorize Smart Flows to connect via OAuth (simplified flow)
Follow this path:
-
If your Smart Flows project is on a Shared or Private Cloud instance
-
If you are using Microsoft Dynamics 365 CE Online
Choose authentication method
| 1. | In the URL page of the connector setup set Type to 'Cloud'. |
| 2. | Paste the URL of your Microsoft Dynamics 365 CE instance. |
| 3. | Decide if you want this connector to target the parent Business Unit of your instance or a Child Business Unit. In the latter case, you can select which Child Business Unit later in the configuration process. |
| 4. | Select Next to proceed to the authorization page. |

Authorize
| 1. | On the next page of the connector setup, you are asked to Authorize Experlogix Smart Flows. |
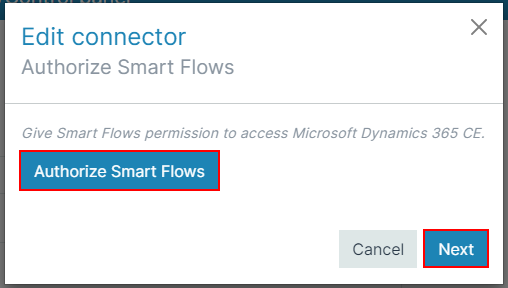
| 2. | In a separate browser tab, the familiar Microsoft login screens will ask you to identify. Make sure to log in with a user that has Minimal User Permissions for the Microsoft Dynamics 365 CE instance you want to connect. When prompted, authorize Experlogix Smart Flows on behalf of your organization. |
| 3. | You will be taken back to the connector setup and see a confirmation message. Continue to the next step to configure the Dataverse Web API connection. |
Connect with Dataverse WebAPI
| 1. | On the next page select the version of the Microsoft Dataverse WebAPI to target. Always select the highest version available. |
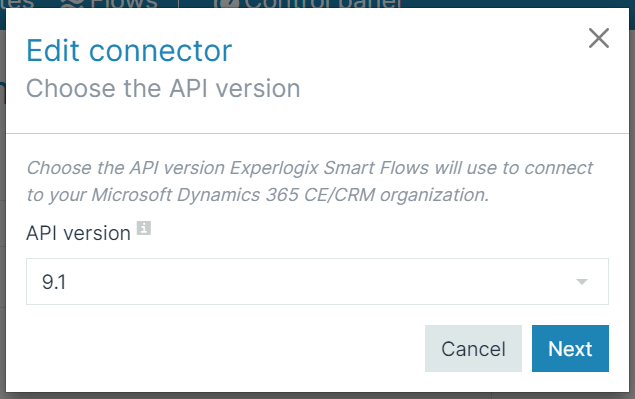
| 2. | Select Next and continue to Part 2 - Install and configure Managed Solution for Microsoft Dynamics 365 CE |
Option 2: Authorize Smart Flows to connect via OAuth with custom app registration in Entra ID
Follow this path:
-
If your Smart Flows project is On-premise
-
If you are using Microsoft Dynamics 365 CE Online
Choose authentication method
| 1. | In the URL page of the connector setup set Type to 'Cloud'. |
| 2. | Paste the URL of your Microsoft Dynamics 365 CE instance. |
| 3. | Decide if you want this connector to target the parent Business Unit of your instance or a Child Business Unit. In the latter case, you can select which Child Business Unit later in the configuration process. |
| 4. | Select Next to proceed to the authorization page. |
Authorize
| 1. | Prepare for authorization by creating an Entra ID App Registration in Microsoft Azure and updating the application.properties file. For more information, see Create an EntraID Application Registration for Experlogix Smart Flows in Microsoft Azure. |
| 2. | On the next page of the connector setup, you are asked to Authorize Experlogix Smart Flows. |
| 3. | In a separate browser tab, the familiar Microsoft login screens will ask you to identify. Make sure to log in with a user that has Minimal User Permissions for the Microsoft Dynamics 365 CE instance you want to connect. When prompted, authorize Experlogix Smart Flows on behalf of your organization. |
| 4. | You will be taken back to the connector setup and see a confirmation message. Continue to the next step to configure the Dataverse Web API connection. |
Connect with Dataverse WebAPI
| 1. | On the next page select the version of the Microsoft Dataverse WebAPI to target. We recommend to select the highest version available. |
| 2. | Select Next and continue to Part 2 - Install and configure Managed Solution for Microsoft Dynamics 365 CE |
Option 3: Authorize Smart Flows to connect via OAuth through Active Directory Federation Services (AD FS)
Follow this path:
-
If your Smart Flows project is on a Shared or Private Cloud instance
-
If you are using Microsoft Dynamics 365 CE On-premise
Choose authentication method
| 1. | In the URL page of the connector setup set Type to On-premise'. |
| 2. | Select 'Active Directory Federation Services' as Authentication Type. |
| 3. | Based on your deployment of AD FS, choose the appropriate AD FS Type. |
| 3.1. | Determine your Active Directory Federation Services (ADFS) Version |
| 4. | Paste the URL of your Microsoft Dynamics 365 CE instance. |
| 5. | Decide if you want this connector to target the parent Business Unit of your instance or a Child Business Unit. In the latter case, you can select which Child Business Unit later in the configuration process. |
| 6. | Select Next to proceed to the authorization page. |
Authorize
| 1. | Prepare for authorization by creating an AD FS OAuth Client for Experlogix Smart Flows. |
-
Create an AD FS OAuth Client for Experlogix Smart Flows (AD FS 4.0 or 5.0)
-
Step 4 – Retrieve the Client IDCreate an AD FS OAuth Client for Experlogix Smart Flows (AD FS 3.0)
| 2. | On the next page of the connector setup, you are asked to Authorize Experlogix Smart Flows. |
| 3. | In a separate browser tab, the familiar Microsoft login screens will ask you to identify. Make sure to log in with a user that has Minimal User Permissions for the Microsoft Dynamics 365 CE instance you want to connect. When prompted, authorize Experlogix Smart Flows on behalf of your organization. |
| 4. | You will be taken back to the connector setup and see a confirmation message. Continue to the next step to configure the Dataverse Web API connection. |
Connect with Dataverse WebAPI
| 1. | On the next page select the version of the Microsoft Dataverse WebAPI to target. We recommend to select the version that corresponds to your current version of Microsoft Dynamics 365 CE. |
| 2. | Select Next and continue to Part 2 - Install and configure Managed Solution for Microsoft Dynamics 365 CE |
Option 4: Authorize Smart Flows to connect via Basic Authentication through Microsoft Active Directory
Follow this path:
-
If your Smart Flows project is on a Shared or Private Cloud instance
-
If you are using Microsoft Dynamics 365 CE On-premise
Choose authentication method
| 1. | In the URL page of the connector setup set Type to 'On-premise'. |
| 2. | Select Active Directory as Authentication Type. |
| 3. | Paste the URL of your Microsoft Dynamics 365 CE instance. |
| 4. | Decide if you want this connector to target the parent Business Unit of your instance or a child Business Unit. In the latter case, you can select which child Business Unit later in the configuration process. |
| 5. | Select Next to proceed to the authorization page. |
Authorize
| 1. | On the next page of the connector setup, you are asked to Authorize Experlogix Smart Flows. |
| 2. | Provide the login credentials of Microsoft Dynamics 365 CE user. Make sure to choose a user that has Minimal User Permissions for the Microsoft Dynamics 365 CE instance you want to connect. |
| 3. | You will be taken back to the connector setup and see a confirmation message. Continue to the next step to configure the Dataverse Web API connection. |
Connect with Dataverse WebAPI
| 1. | On the next page select the version of the Microsoft Dataverse WebAPI to target. We recommend to select the version that corresponds to your current version of Microsoft Dynamics 365 CE |
| 2. | Select Next and continue to Part 2 - Install and configure Managed Solution for Microsoft Dynamics 365 CE |
Part 2 - Install and configure Managed Solution for Microsoft Dynamics 365 CE
The Experlogix Smart Flows managed solution extends Microsoft Dynamics 365 CE with the required components to use Smart Flows directly from within the Dynamics user interface. During connector setup, Smart Flows can automatically detect whether this managed solution is already installed in the connected Dynamics 365 CE instance and will display the currently installed solution version.
Experlogix Smart Flows Managed Solution for Microsoft Dynamics 365 CE
Solution detection during connector setup
When configuring the Smart Flows connector, the setup wizard automatically checks the connected Dynamics 365 CE organization to determine whether the Smart Flows managed solution is installed and which version of the solution is currently present
Import options
During connector setup, you can choose one of the following options:
-
Import automatically (recommended) - Smart Flows automatically imports the latest compatible version of the managed solution into your Dynamics 365 CE organization. This is the recommended option, as it:
-
Requires no manual steps
-
Ensures version compatibility
-
Reduces the risk of installation errors
-
-
Import manually - If you prefer manual control, you can download and import the managed solution yourself. The solution package can be obtained from:
-
The connector configuration wizard
-
The Smart Flows knowledge base
Microsoft AppSource
-
-
Skip import - You can choose to skip installation if the solution is already installed or you plan to install or upgrade it at a later time. Note that Smart Flows buttons and entities will not be available in Dynamics 365 CE until the managed solution is installed.
Select Next to check progress of the import and to continue to the configuration of your managed solution.
Configuration options
After import of the managed solution, you can configure it automatically from the connector setup. This is recommended, especially when you are importing the solution for the first time. If the solution is already imported, you can reach these configurations via the Microsoft Dynamics 365 CE user interface. To do so, navigate to the Smart Flows Configurations entity in the Experlogix Smart Flows App.
| 1. | Update the Smart Flows Configuration Record automatically (recommended) - Check this box if you want Smart Flows to automatically write the configuration settings back into the Smart Flows configuration record stored in your Microsoft Dynamics 365 CE instance. |
| 2. | Hide API key (recommended) - Enable this to conceal the API key value from the configuration UI and instead store it in a separate entity. The API key is used by the Smart Flows service to authenticate and communicate with your Microsoft Dynamics 365 CE instance. Hiding it improves security by preventing accidental exposure. |
| 3. | Smart Flows buttons visibility - This dropdown controls where Smart Flows buttons show up within Dynamics: |
| 3.1. | Show button(s) on entities with flows (default) - Only displays Smart Flows action buttons on entity forms or lists where flows have been configured. |
| 3.2. | Show button(s) on all entities - Displays the Smart Flows button across all entities, even if no flows exist for them. |
| 4. | Smart Flows buttons in ribbon - This determines the style of the command bar buttons users see: |
| 4.1. | List of Pinned Flows (dropdown) - Shows a dropdown in the ribbon listing the specific flows that have been tagged with the flyout tag. In this scenario the user selects a flow in the dropdown portion of the button to start an execution of that flow. |
| 4.2. | Open Flow Execution Panel (simple button) - Shows a simple button in the ribbon to open the Flow Execution Panel. In this scenario the user selects a flow in the panel to start an execution. |
| 4.3. | Both Shows both button styles in the ribbon. |
| 5. | Fly-out behavior - Controls how flows that require user input behave when started from the flyout button: |
| 5.1. | Prompt user for input (default) - Requests the user to provide input where-ever defined in the flow definition. |
| 5.2. | Skip user input - Runs the flow without pausing for user input. |
| 6. | Browser tab behavior - Determines how the Flow Execution Panel opens in the browser: |
| 6.1. | Reuse opened tab (default) - If an instance of the Flow Execution Panel has already been opened in a browser tab, Smart Flows will attempt to reuse it. This reduces tab clutter. |
| 6.2. | Open new tab - Always opens a new browser tab for each flow execution session. |
| 7. | Select Next to proceed to the summary and the end of the connector configuration. |
Part 3 - Giving Microsoft Dynamics 365 CE Users access to flows
When the connector has been fully configured, you can start to build data sets, templates and flows that are related to the context of your connected Microsoft Dynamics 365 CE instance. Before users can execute these flows from within the Microsoft Dynamics 365 CE user interface, they need access to the buttons in the ribbon and they need to be known as active and licensed Experlogix Smart Flows users.
Managing access to Experlogix Smart Flows buttons and entities in Microsoft Dynamics 365 CE
The managed solution package imported in Part 2 of the connector configuration, contains prepackaged security roles, which you can assign either to users or user groups, to give the permission to use Experlogix Smart Flows features in the context of Microsoft Dynamics 365 CE.
Experlogix Smart Flows security roles
-
Experlogix Smart Flows Administrator - Full access to the buttons and the Smart Flows app in Microsoft Dynamics CE. When logging in to the Experlogix Smart Flows for the first time, users with this security role will be created in Smart Flows as Administrators.
-
Experlogix Smart Flows Designer - Access to the ribbon buttons and the Flow Execution Panel in the context of Microsoft Dynamics 365 CE. When logging in to the Experlogix Smart Flows for the first time, users with this security role will be created in Smart Flows as Designers.
-
Experlogix Smart Flows User - Access to the ribbon buttons and the Flow Execution Panel in the context of Microsoft Dynamics 365 CE. When logging in to the Experlogix Smart Flows for the first time, users with this security role will be created in Smart Flows as regular Users.
Assigning security roles to users or user groups
Follow Microsoft’s standard procedures to assign the Experlogix Smart Flows security roles to users and user groups. Roles are cascading, if you assign multiple roles to the same user or group, they have the permissions of the highest role in the cascade.
-
For Microsoft Dynamics 365 CE Online: Manage user accounts, user licenses, and security roles - Dynamics 365 Customer Insights.
-
For Microsoft Dynamics 365 CE On-premise:
Add users and assign roles in Dynamics 365 Customer Engagement (on-premises)
.
Configuring the Microsoft Dynamics 365 CE connector for single sign-on (Recommended)
To successfully use Smart Flows from Microsoft Dynamics 365 CE, users must be properly recognized and licensed within Smart Flows. While Dynamics 365 CE security roles control the visibility of Smart Flows action buttons in the ribbon, they do not by themselves grant the ability to execute flows.
Smart Flows user requirements
For a user to run Smart Flows from Dynamics 365 CE, the following conditions must be met:
-
The user must exist in the Smart Flows user table
-
The user must be active in Smart Flows
-
A valid Smart Flows license must be assigned to the user
If a user only has a Dynamics 365 CE security role that exposes Smart Flows buttons, the buttons will be visible, but flow execution will fail if the user is not known, licensed, and active in Smart Flows.
Automatic user creation and licensing (recommended)
By default, Smart Flows supports automatic user provisioning for Dynamics 365 CE users:
-
When a user runs their first Smart Flow from Dynamics 365 CE, Smart Flows will:
-
Automatically create the user in the Smart Flows user table
-
Activate the user
-
Assign an available Smart Flows license
-
This behavior ensures a seamless onboarding experience for end users and minimizes administrative overhead.
Required connector setting
To enable automatic user creation and licensing, it is highly recommended to keep the Allow users to log in to Smart Flows with this connector setting enabled. You can verify this setting as follows:
| 1. | In the Project Console, navigate to Control Panel > Connectors. |
| 2. | Open the active Microsoft Dynamics 365 CE connector. |
| 3. | Go to Basic Settings. |
| 4. | Under Authentication settings, confirm that, 'Allow users to log in to Smart Flows with this connector' is set to Yes. |
If this setting is disabled, users will not be automatically created or licensed in Smart Flows, and flow execution from Dynamics 365 CE will fail unless users are manually managed in advance.
Syncing Microsoft Dynamics 365 CE users with an Experlogix Smart Flows security role (Optional)
Smart Flows provides a user synchronization capability that allows you to automatically create active, licensed users in the Smart Flows user table based on users from connected systems, such as Microsoft Dynamics 365 CE. User syncing is especially useful to ensure a smooth first-time experience for end users.
By syncing users in advance, Smart Flows already recognizes users when they run their first flow execution. This avoids delays or execution issues that can otherwise occur when users are created and licensed on demand.
How user syncing works:
When user syncing is executed:
-
Smart Flows retrieves users from all connected systems
-
Only users who have a Smart Flows role in the connected system are included
-
For each retrieved user, Smart Flows will:
-
Create a corresponding record in the Smart Flows user table
-
Set the user to active
-
Assign a Smart Flows license
-
This ensures that only authorized users are provisioned and that they are ready to use Smart Flows immediately.
User syncing is recommended when:
-
You want to onboard many users at once.
-
You want to avoid first-run delays for users.
-
You prefer controlled, preemptive user provisioning instead of on-demand creation.
-
You are rolling out Smart Flows to a new group or organization.
How to sync users:
To start user synchronization:
| 1. | In the Project Console, navigate to Control Panel > Users. |
| 2. | In the command bar of the user table, select Sync. |
Once started, Smart Flows launches a background operation that retrieves all users from connected systems who have a Smart Flows role assigned.
All retrieved users are then created as active, licensed users in the Smart Flows user table. After sync, you’ll see a summary of the sync operation result, indicating how many users have been updated per synced connector and showing sync errors, if any.
Connector-specific user sync settings
In addition to the general user sync functionality, Smart Flows provides connector-specific user sync settings that allow you to fine-tune how users are retrieved from a connected system and how they are provisioned in the Smart Flows user table. These settings are available per connector and reflect the structure and security model of the connected system.
For Microsoft Dynamics 365 CE, user sync settings take business units and security roles into account, allowing precise control over which Dynamics users are synced and which Smart Flows roles they receive.
To manage connector-specific user sync settings for your Microsoft Dynamics 365 CE connector:
| 1. | In the Project Console, navigate to the Control panel > Connectors. |
| 2. | Open your Microsoft Dynamics 365 CE Connector. |
| 3. | Within the connector, select User sync settings. |
Business unit user sync behavior
Dynamics 365 CE organizes users in business units, often with a parent–child hierarchy. Smart Flows allows you to control how this hierarchy is handled during user sync:
-
Include child business unit users - When enabled, Smart Flows will sync users from the selected business unit and all its child business units.
-
Exclude child business unit users - When selected, only users from the selected business unit are considered during user sync.
This setting helps ensure that user provisioning aligns with your Dynamics organizational structure.
Synchronize additional users from Microsoft Dynamics 365 CE
By default, Smart Flows syncs users who have an explicit Smart Flows role in Dynamics 365 CE. In addition, you can configure Smart Flows to synchronize extra users based on Dynamics security roles, even if they do not have a dedicated Smart Flows role assigned.
This is done by mapping Dynamics 365 CE security roles to Smart Flows roles.
Role mapping behavior
For each Smart Flows role, you can define one or more Dynamics 365 CE security roles:
-
Administrator - Users with the mapped Dynamics roles will be synced as Smart Flows Administrators.
-
Designer - Users with the mapped Dynamics roles will be synced as Smart Flows Designers, allowing them to create and manage flows.
-
User - Users with the mapped Dynamics roles will be synced as Smart Flows Users, allowing them to execute flows.
You can add multiple Dynamics security roles per Smart Flows role using the + button. The mapping applies across all business units.
Configuring the Microsoft Dynamics 365 CE connector for individual user authentication (Optional)
Smart Flows supports individual user authentication, allowing flows to execute actions using the identity of the actual active user, rather than using the connector user impersonating that user. This ensures that all actions performed through a connector respect the permissions, access rights, and audit context of the user who started the flow.
When individual user authentications are enabled, Smart Flows executes connector actions as the authenticated end user, providing stronger security, clearer auditing, and aligning with user-level permissions in connected systems such as Microsoft Dynamics 365 CE.
Enabling individual user authentications
Individual user authentications are configured at the connector level:
| 1. | In the Project Console, navigate to Control Panel > Connectors. |
| 2. | Open your connector. |
| 3. | Navigate to the User authentications section. |
| 4. | Toggle between: |
-
Use impersonation (connector user executes actions on behalf of users)
-
Enable user authentications (actions execute as the actual authenticated user)
When Enable user authentications is selected, Smart Flows switches from impersonation to true user-based execution.
User authentication behavior during flow execution
When a user starts a flow and execution reaches a flow block that requires authentication:
-
The user is prompted to authenticate for that connected system.
-
Authentication is OAuth-based.
-
Once completed, Smart Flows securely stores the user’s OAuth tokens.
-
Stored tokens are reused for subsequent executions, avoiding repeated sign-in prompts.
This ensures a smooth user experience after the initial authentication.
Managing user authentication status
Users can manage their own authentication state:
| 1. | Open the Flow Execution Panel. |
| 2. | Select your username in the right top corner and go to Settings. |
| 3. | View connected applications and authentication status. |
| 4. | Reauthenticate or remove their authentication if needed. |
This gives users visibility and control over their own connections.
Administrative control over user tokens
Administrators can centrally manage user authentications:
| 1. | In the Project Console, navigate to Control Panel > User authentications. |
| 2. | Revoke OAuth tokens for specific users and connectors. |
Revoking tokens forces users to reauthenticate the next time a flow requires access.
Non-interactive flow execution behavior
Flows may also run in non-interactive mode, meaning there is no active user present to authenticate (for example, background executions, scheduled runs, or system-triggered flows). In these cases, Smart Flows follows the behavior configured in the User authentications section of the connector.
You can choose one of the following options:
-
Fallback to connector user - The flow continues execution using the connector user credentials.
-
Fallback to connector user and generate a warning on the flow execution - The flow runs using the connector user, but a warning is logged to indicate that user authentication was not available.
-
Pause flows and wait for the user to authenticate - Flow execution is paused until a user authenticates, after which execution continues.
-
End flow with error - The flow stops immediately and fails if no user authentication is available.
These options allow you to balance security, transparency, and automation depending on your organization’s requirements.
Part 4 (Optional) - Fine-tuning the Microsoft Dynamics 365 CE connector
When your Microsoft Dynamics 365 connector has been fully configured and your users have been configured correctly to use it, no additional steps are required. In this final section, you can discover additional settings to fine-tune your Microsoft Dynamics 365 CE connector.
Configuring the data collection pattern for Microsoft Dynamics 365 CE (FetchXML or OData)
Experlogix Smart Flows supports two “fetch patterns” when retrieving data from Microsoft Dynamics 365 Customer Engagement (CE):
-
FetchXML
-
OData (Web API)
The default data collection pattern is configured at the plugin level in the Control panel. This default can then be overridden per data set when specific querying behavior is required.
Setting the default data collection pattern (plugin level)
The default query mechanism for Microsoft Dynamics 365 CE is configured at the plugin level.
| 1. | In the Project Console, navigate to Control panel > Settings > Plugin settings. |
| 2. | Select Dynamics. |
| 3. | Locate the Fetch settings section. |
| 4. | Choose one of the following options: |
-
Use FetchXML
-
Use OData
This setting defines the default data collection pattern that will be used by all Dynamics 365 CE data sets, unless explicitly overridden.
Overriding the data collection pattern at data set level
In addition to the default data collection pattern configured in the Dynamics plugin settings, Smart Flows allows you to override the query mechanism per data set.
This provides fine-grained control when a specific entity or query requires a different approach than the project-wide default.
| 1. | Go to Data sets. |
| 2. | Open an existing Microsoft Dynamics 365 CE data set or create a new one. |
| 3. | Navigate to Basic Settings. |
| 4. | Locate the Fetch settings field. |
| 5. | Select one of the following options: |
-
Default (use FetchXML) - Uses the data collection pattern configured in the Dynamics plugin settings.
-
Use FetchXML - Explicitly forces FetchXML for this data set, regardless of the plugin default.
-
Use OData - Explicitly forces OData for this data set, regardless of the plugin default.
| 6. | Save the data set. |
Once configured, the selected option applies to all queries executed by this data set.
Filtering flows per Microsoft Dynamics 365 CE Security Role
Experlogix Smart Flows allows you to filter visibility of a particular flow in Microsoft Dynamics 365 CE. The 'Access' system tag category, which can be set per flow, determines which users can see a flow in:
-
The dropdown section of the Smart Flows fly-out ribbon button in Dynamics 365 CE.
-
The flow selection screen of the flow execution panel.
For Microsoft Dynamics 365 CE connectors, this category automatically exposes all security roles from the connected CE environment as selectable tags.
To set Access tags for a flow:
| 1. | Open a flow with the flow trigger set to Microsoft Dynamics 365 CE or create one. |
| 2. | In Flow Builder select Edit in the control bar at the top. |
| 3. | In the edit view of the flow, navigate to Tags. |
| 4. | Select one or more security roles in the Access system tag group. The behavior is as follows: |
-
No access tags selected - The flow is visible to all users.
-
One or more access tags selected - The flow is only visible to users who have at least one of the selected Dynamics 365 CE security roles.
This makes access tags ideal for limiting flows to specific user groups, such as sales users, service agents, or administrators, without needing separate flows or connector configurations.
Configuring flows to run without opening a Flow Execution Panel
Experlogix Smart Flows allows you to control how a particular flow is presented in the Microsoft Dynamics 365 CE ribbon by using a system tag. The Availability system tag category controls this behavior. To set it:
| 1. | Open a flow with the flow trigger set to Microsoft Dynamics 365 CE or create one. |
| 2. | In Flow Builder select Edit in the control bar at the top. |
| 3. | In the edit view of the flow, navigate to Tags. |
| 4. | Set tags in the Availability system tag group. The behavior is as follows: |
-
Flyout - Lists the flow in the drop-down section of the Smart Flows ribbon button. When selected, running the flow opens the Flow Execution Panel. Users can actively follow the progress and see execution details.
-
Flyout (run in the background) - Also lists the flow in the dropdown section of the ribbon button. When executed, the flow runs in the background. Instead of opening the Flow Execution Panel, Smart Flows shows a small notification pop up in the Dynamics 365 CE UI indicating that the flow is running. The popup includes a link to open the flow execution panel, allowing users to view progress if needed. This option is particularly useful for long-running or background processes where immediate user interaction is not required, or simply to retain the user’s focus on the active Microsoft Dynamics 365 CE list or record view.
-
None selected - If none of the tags in the availability category are selected, then the flow will not be listed in the drop-down portion of the ribbon button in Microsoft Dynamics 365 CE. It can only be started from the flow selection screen in the Flow Execution Panel in that case.
Configuring the pattern to create Microsoft SharePoint Document Locations in the context of a Microsoft Dynamics 365 CE connector
Smart Flows allows you to leverage Microsoft Dynamics 365 CE SharePoint Document Locations to associate SharePoint document storage with the context of Dynamics records. This enables flows to store documents directly in the correct SharePoint location that is linked to a specific record in Dynamics 365 CE.
To make a record’s SharePoint Document Location available within a flow, you can reference it from your Microsoft Dynamics 365 CE data sets. Each entity that supports SharePoint integration exposes a field named SharePoint Document Locations (xd_sharepoint_document_locations). This field can be used to retrieve the SharePoint document location associated with the record being processed.
When this field is mapped in a Store in Microsoft SharePoint flow block, Smart Flows will automatically store the generated file in the corresponding SharePoint location for that record.
If a record does not yet have any SharePoint Document Locations associated with it, Smart Flows will automatically create one during flow execution. The structure of newly created SharePoint Document Locations is controlled centrally via the Plugin settings in Smart Flows. These settings can be accessed through Control panel > Settings > Plugin Settings, where you define the folder path pattern that Smart Flows follows when creating SharePoint Document Locations in the context of Microsoft Dynamics 365 CE records.