Deploy Smart Flows On-Premises
Deploying Experlogix Smart Flows in an on-premises environment enables organizations to maintain full control over their infrastructure, data security, and integration layers. This section provides all the resources needed to plan, install, configure, and manage Smart Flows in self-hosted environments, including both traditional installations and container-based (Docker) setups.
Smart Flows on-prem deployments require careful consideration of prerequisites such as network accessibility, DNS configuration, certificate handling, and infrastructure sizing. Detailed guidance is provided on configuring your application, setting up SQL Server, managing licensing, and ensuring compatibility with enterprise authentication and connector systems such as Microsoft Dynamics 365 CE.
Whether you are setting up your first on-prem project or managing a multi-environment architecture (Development, Test, and Production), these topics will help ensure that your system is installed securely, configured correctly, and ready for scalable document automation.
Topics Covered in This Section Include:
-
Prerequisites (SSL, ports, domain, certificates)
-
System and database requirements
-
Traditional and Docker-based installation methods
-
Creating the application configuration (application.properties)
-
Configuring authentication, connectors, and JWT handling
-
Managing services and testing deployments
-
Setting up and securing SQL Server for Smart Flows
-
Starting and validating the Smart Flows service
Prerequisites for Smart Flows On-Premises Installation
Before installing Smart Flows on-premises, ensure your environment meets key infrastructure requirements. This section outlines the networking, port, and SSL certificate configurations necessary for a successful deployment.
Networking Requirements
Your Experlogix Smart Flows server needs to be accessible in
your network through a browser and be able to communicate with the subsite![]() Document pack(s) is the additional documents that can be added to the license if the maximum documentation count reaches its limit. server.
Document pack(s) is the additional documents that can be added to the license if the maximum documentation count reaches its limit. server.
Domain Name Configuration
-
You will need to be able to make DNS changes for your organization's domain
-
The FQDN must resolve and translate to your server IP from the internet
Smart Flows Port Numbers
You should always use the default ports unless it is restricted. The use of Secure Sockets Layer (SSL) is necessary for a proper communication with Microsoft services such as Microsoft 365 and Microsoft Dynamics 365 CE .
WARNING : Make sure your firewall allows traffic on these ports.
For servers with multiple roles, allow your traffic on multiple ports:
|
Port # |
Function |
|---|---|
|
443 |
Production |
|
1443 |
Development |
|
2443 |
Test |
Installation Folder Path
Create the installation folder: C:\Experlogix -Smart Flows .
SSL Certificate Setup
The use of SSL![]() Secure Sockets Layer, is an encryption-based Internet security protocol. It was first developed by Netscape in 1995 for the purpose of ensuring privacy, authentication, and data integrity in Internet communications. SSL is the predecessor to the modern TLS encryption used today. encryption is required for the Smart Flows system to function. To enable SSL encryption, you need an SSL Certificate that matches your FQDN.
Secure Sockets Layer, is an encryption-based Internet security protocol. It was first developed by Netscape in 1995 for the purpose of ensuring privacy, authentication, and data integrity in Internet communications. SSL is the predecessor to the modern TLS encryption used today. encryption is required for the Smart Flows system to function. To enable SSL encryption, you need an SSL Certificate that matches your FQDN.
If you install multiple projects on one server, you can also use a wildcard certificate![]() a digital certificate that is applied to a domain and all its subdomains. Wildcard notation consists of an asterisk and a period before the domain name. Secure Sockets Layer (SSL) certificates often use wildcards to extend SSL encryption to subdomains. for the CN . For example *.base.domain.com with *base.domain.com and base.domain.com as alternative names. The "*base" component of the address serves as a "fill in the blank" to properly direct to all versions of the address that end in ".domain.com"
a digital certificate that is applied to a domain and all its subdomains. Wildcard notation consists of an asterisk and a period before the domain name. Secure Sockets Layer (SSL) certificates often use wildcards to extend SSL encryption to subdomains. for the CN . For example *.base.domain.com with *base.domain.com and base.domain.com as alternative names. The "*base" component of the address serves as a "fill in the blank" to properly direct to all versions of the address that end in ".domain.com"
SSL Certificate Format Guidelines
-
The recommended format is PFX
 PKCS #12 defines an archive file format for storing many cryptography objects as a single file. It is commonly used to bundle a private key with its X.509 certificate or to bundle all the members of a chain of trust.
 -
The Certificate must be valid
-
You must have the PFX password available
Store the PFX file inside the installation folder (C:\Experlogix-Smart Flows).
To support a deployment of Smart Flows, your servers must meet minimum hardware and software specifications. This section covers requirements for both the Smart Flows application server and the associated SQL database server.
Smart Flows Server Hardware Requirements
Although it's possible to run Smart Flows and its database server on one machine, for performance reasons it is always preferred to separate the components. Generally, only customers with a small implementation and one environment can install on one machine.
When using multiple environments (Production, Development, TEST, UAT, etc), we recommend a separate server for non-production environments.
|
Component |
Hardware Requirement |
|---|---|
| Operating System | Windows Server (2016+) with AD FS 4.0+ |
| Processor | Dual-core |
| RAM | 8GB |
| Disk Space | <500MB |
We recommend using the AdoptOpenJDK 21 LTS build using the Hotspot VM, select here to download.
Please contact Experlogix Support if you need help in updating Java.
|
Software Requirement |
|---|
| .NET Framework: 4+ |
|
Java: Java SE Development Kit 21 or higher |
Smart Flows Database Requirements
|
Component |
Hardware Requirement |
|---|---|
| Operating System | Windows Server (2016+) with AD FS 4.0+ |
| Processor | Quad-core |
| RAM | 8GB |
| Disk Space | Dependent on the size and amount of documents generated and the scheduled cleanup |
|
Software Requirements |
|---|
| SQL server version 2016 or later |
| Smart Flows requires a SQL Server authentication-based user |
| TCP/IP must be enabled, with a fixed TCP/IP port |
| Connect via a JDBC Connection String, username, and password |
OAuth Permissions for Microsoft Dynamics 365 CE Connector
For Microsoft Dynamics 365 CE, a service account is necessary when configuring the connector. Client ID and secret are not supported. Smart Flows uses user delegation. This allows Smart Flows to access data from Microsoft Dynamics 365 CE on behalf of the end user.
Required Permissions
-
Read permissions for every entity that you want to use in your flows and templates.
-
Permission to create a letter, e-mail activity, task, and note regarding any of those entities.
-
Full control for the Smart Flows Configuration entity created by our managed solution (another way of doing this is by giving the Smart Flows Admin role to the service account).
-
If you want to use the e-mail for Microsoft Dynamics 365 CE flow block to send e-mail on another user's behalf see - Power Platform | Microsoft Learn to send e-mails in the name of those users.
-
The delegate role to allow the service account to act on behalf of the user.
Installing Smart Flows Server On Premises
To download the server component (a zip file), you will need a Freshdesk account. You can request access through our Client and Support Operations team, or you will get it after purchasing the license. The two most popular methods of installing Smart Flows are:
-
The traditional install that installs Smart Flows on your computer
-
Using containers, such as Docker Desktop, which allows you to install Smart Flows in a container environment
We recommend using the AdoptOpenJDK 21 LTS build using the Hotspot VM, select here to download.
Please contact Experlogix Support if you need help in updating Java.
Install Smart Flows Using Traditional Method
Extract Server Installation Files
| 1. | Unpack the ZIP file in the installation folder (C:\Xpertdoc-SmartFlows\). |
| 2. | Rename the folder to be meaningful. |
Create the application.properties file
In the example below, the saved location is project-prod.
| 1. | In the project folder, create a blank text file and save it with the name application.properties. |
If you are upgrading or installing Smart Flows after version 4.24.0, will be JDBC Driver 12.6. This is update automatically when install Smart Flows. You'll also want to ensure that your connection and application properties reflect the latest best practices.
-
trustServerCertificate is now optional and should only be used when a trusted certificate is unavailable.
-
Use encrypt=true whenever possible to ensure secure connections.
-
Verify that your application.properties file includes a valid connection string as outlined in the official Microsoft documentation.
project.datasource.jdbc-url=jdbc:sqlserver://PRD-V-SQL-DB02;database=XprtDoc;encrypt=true;hostNameInCertificate=*.database.windows.net;loginTimeout=30;lockTimeout=5000;socketTimeout=300000server.port=443
project.baseurl=https://xsfl-server:443server.ssl.key-store=../yourpfxfile.pfx
server.ssl.key-store-password=yourpfxpassword
server.ssl.key-store-type=pkcs12trustServerCertificate=false; should not be included unless the environment requires it.
-
New driver versions do not require this setting unless using self-signed or untrusted certificates.
-
If trustServerCertificate is still needed, it should be explicitly added (trustServeerCrtificate=true), but only if a trusted certificate is unavailable.
project.datasource.jdbc-url=jdbc:sqlserver://PRD-V-SQL-DB02;database=XprtDoc;encrypt=true;trustServerCertificate=false;
project.datasource.jdbc-url=jdbc:sqlserver://PRD-V-SQL-DB02;database=XprtDoc;encrypt=true;trustServerCertificate=false;
hostNameInCertificate=*.database.windows.net;loginTimeout=30;lockTimeout=5000;socketTimeout=300000
project.datasource.username=sa
project.datasource.password=secretsapasswordsample.user.password=secretadminpassword
# Uncomment when using HTTP instead of HTTPS:
# cookie.secure=falseSSL Certificate SetupThe use of SSL![]() Secure Sockets Layer, is an encryption-based Internet security protocol. It was first developed by Netscape in 1995 for the purpose of ensuring privacy, authentication, and data integrity in Internet communications. SSL is the predecessor to the modern TLS encryption used today. encryption is required for the Smart Flows system to function. To enable SSL encryption, you need an SSL Certificate that matches your FQDN.If you install multiple projects on one server, you can also use a wildcard certificate
Secure Sockets Layer, is an encryption-based Internet security protocol. It was first developed by Netscape in 1995 for the purpose of ensuring privacy, authentication, and data integrity in Internet communications. SSL is the predecessor to the modern TLS encryption used today. encryption is required for the Smart Flows system to function. To enable SSL encryption, you need an SSL Certificate that matches your FQDN.If you install multiple projects on one server, you can also use a wildcard certificate![]() a digital certificate that is applied to a domain and all its subdomains. Wildcard notation consists of an asterisk and a period before the domain name. Secure Sockets Layer (SSL) certificates often use wildcards to extend SSL encryption to subdomains. for the CN . For example *.base.domain.com with *base.domain.com and base.domain.com as alternative names. The "*base" component of the address serves as a "fill in the blank" to properly direct to all versions of the address that end in ".domain.com"SSL Certificate Format GuidelinesThe recommended format is PFX
a digital certificate that is applied to a domain and all its subdomains. Wildcard notation consists of an asterisk and a period before the domain name. Secure Sockets Layer (SSL) certificates often use wildcards to extend SSL encryption to subdomains. for the CN . For example *.base.domain.com with *base.domain.com and base.domain.com as alternative names. The "*base" component of the address serves as a "fill in the blank" to properly direct to all versions of the address that end in ".domain.com"SSL Certificate Format GuidelinesThe recommended format is PFX![]() PKCS #12 defines an archive file format for storing many cryptography objects as a single file. It is commonly used to bundle a private key with its X.509 certificate or to bundle all the members of a chain of trust.The Certificate must be validYou must have the PFX password availableStore the PFX file inside the installation folder (C:\Experlogix-Smart Flows).
PKCS #12 defines an archive file format for storing many cryptography objects as a single file. It is commonly used to bundle a private key with its X.509 certificate or to bundle all the members of a chain of trust.The Certificate must be validYou must have the PFX password availableStore the PFX file inside the installation folder (C:\Experlogix-Smart Flows).
| 2. | Update the following parameters according to your setup. |
project.baseurl: the address of your XSF![]() Flavour in Licensing is related to connectors. For Smart Flows you have the following connector options under Flavour section: Microsoft Dynamic 365 CE, Mocrosoft Dynamic 365 F&O, Salesforce, and Sugar server as seen by the end-user (include port number if not using default port).
Flavour in Licensing is related to connectors. For Smart Flows you have the following connector options under Flavour section: Microsoft Dynamic 365 CE, Mocrosoft Dynamic 365 F&O, Salesforce, and Sugar server as seen by the end-user (include port number if not using default port).
server.ssl.key-store.
server.ssl.key-store-password: replace with the password of your certificate.
server.ssl.key-store-type: do not change.
project.datasource.jdbc-url.
project.datasource.username.
project.datasource.password.
sample.user.password: choose a password for your first login (It will be changed at the initial project setup).
Configure JWT Token Settings
|
Property |
Description |
Required |
Value |
|---|---|---|---|
|
jwt.secret |
The secret is used when signing and validating JWTs provided by Smart Flows. |
No (highly recommended) |
Randomly chosen Example: 1e38b0lMFqccDuOA The |
|
jwt.expiration |
The duration in seconds for which a JWT is valid. |
No | 86400 (= 24 hours) |
|
cookie.salt |
The value is used to encode cookie stamp. If not set, it will get generated on startup. This means all user sessions will be invalid on restart of the server. |
No |
Randomly chosen* Example: 797204 The |
(Optional) Setup Docusign Connector
If you want to configure Docusign, you need to make changes to the application.properties file. Refer to Docusign (E-sign) connector set up for more details.
Update smartflows-server.xml Configuration
The file can be found in the project folder. Update the content of the file to reflect role of the server.
<service>
    <id>smartflows-server</id>
    <name>Xpertdoc Smart Flows Server</name>
    <description>Xpertdoc Smart Flows Server</description>
    ...
</service>
To differentiate multiple Smart Flows servers on the same machine, change the service parameters as follows:
| 1. | Rename the service id from ‘smartflows-server’ to ‘smartflows-prod’. |
| 2. | Rename the service name to ‘Xpertdoc Smart Flows Prod’. |
Install Smart Flows using Docker
If you prefer containerized deployment, you can use Docker to install Smart Flows in a more modular and scalable environment. This section walks through editing Docker files and executing Docker build commands.
Prerequisites:
Docker for Windows, Notepad ++
| 1. | Download the Docker zip file and extract. All properties normally in the application.properties file must now be listed in the Dockerfile. |
| 2. | Using Notepad ++, edit the Docker file. Use capital letters and underscore instead of period. |
You must use capital letters and underscores instead of periods for Docker to read the file.
| 3. | Unzip the server component zip file and place the unzipped files with the Docker files. |
| 4. | From the command line go to your current location and type: |
Ensure your Smart Flows server version matches your actual server version.
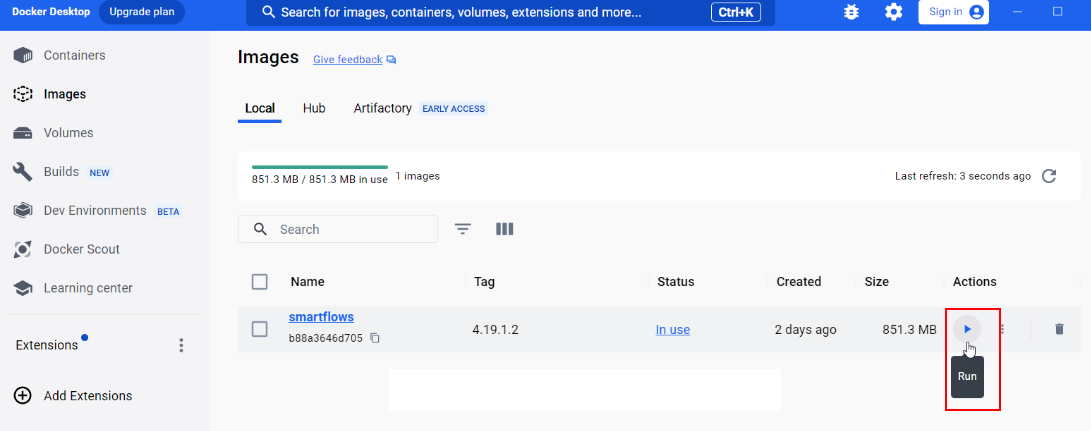
docker build . --build-arg JAR_FILE=smartflows-server-4.19.1.2.jar -t smartflows:4.19.1.2| 5. | From the Docker Desktop, select the Run button. |
Smart Flows opens in the Docker container.
Start and Validate the Smart Flows Service
When starting your Smart Flows service for the first time, an administrator must confirm the service is active. This topic walks administrators through the process of confirming your Experlogix Smart Flows service is active and ready for login.
Install and Launch Smart Flows as a Service
| 6. | Open the command prompt as an Administrator. |
| 7. | Navigate to the project folder. |
| 8. | Run each of the following commands to install & start Smart Flows as a Windows service. |
C:\Users\myprofile>cd C:\Xpertdoc Smart Flows\project-prodC:\Xpertdoc Smart Flows\project-prod> smartflows-server installC:\Xpertdoc Smart Flows\project-prod> smartflows-server startVerify Smart Flows Service Activation
Once you’ve executed the install command and started the service, you can confirm the system’s activation via the log file. Your server XML file in the installation folders specifies where you have configured your system to store the log files. To confirm if the service is started you can always check the log files.
| 1. | Navigate to the XML file located in your installation folder. |
| 2. | Note where the system indicates where the logs are stored, for example, C:\Xpertdoc Smart Flows\project-prod> smartflows-server start. |
| 3. | Navigate to the log file location you noted in STEP 2 Confirming Smart Flows service start on page 1 . |
| 4. | Open the log file and verify activation |
| 4.1. | If your log file includes, the entry application started, you have successfully started your Smart Flows service. Please continue to Test Smart Flows Service. |
| 4.2. | If your log file does not include entry application started, please repeat STEP 1 Confirming Smart Flows service start on page 1 through STEP 3 Confirming Smart Flows service start on page 1 to install and activate your Smart Flows service. If you continue to experience issues, please reach out to our Customer Success Team. |
Test and Log In Smart Flows Service
Now that your Smart Flows service is active, you can navigate to it in your browser and login to your project for the first time.
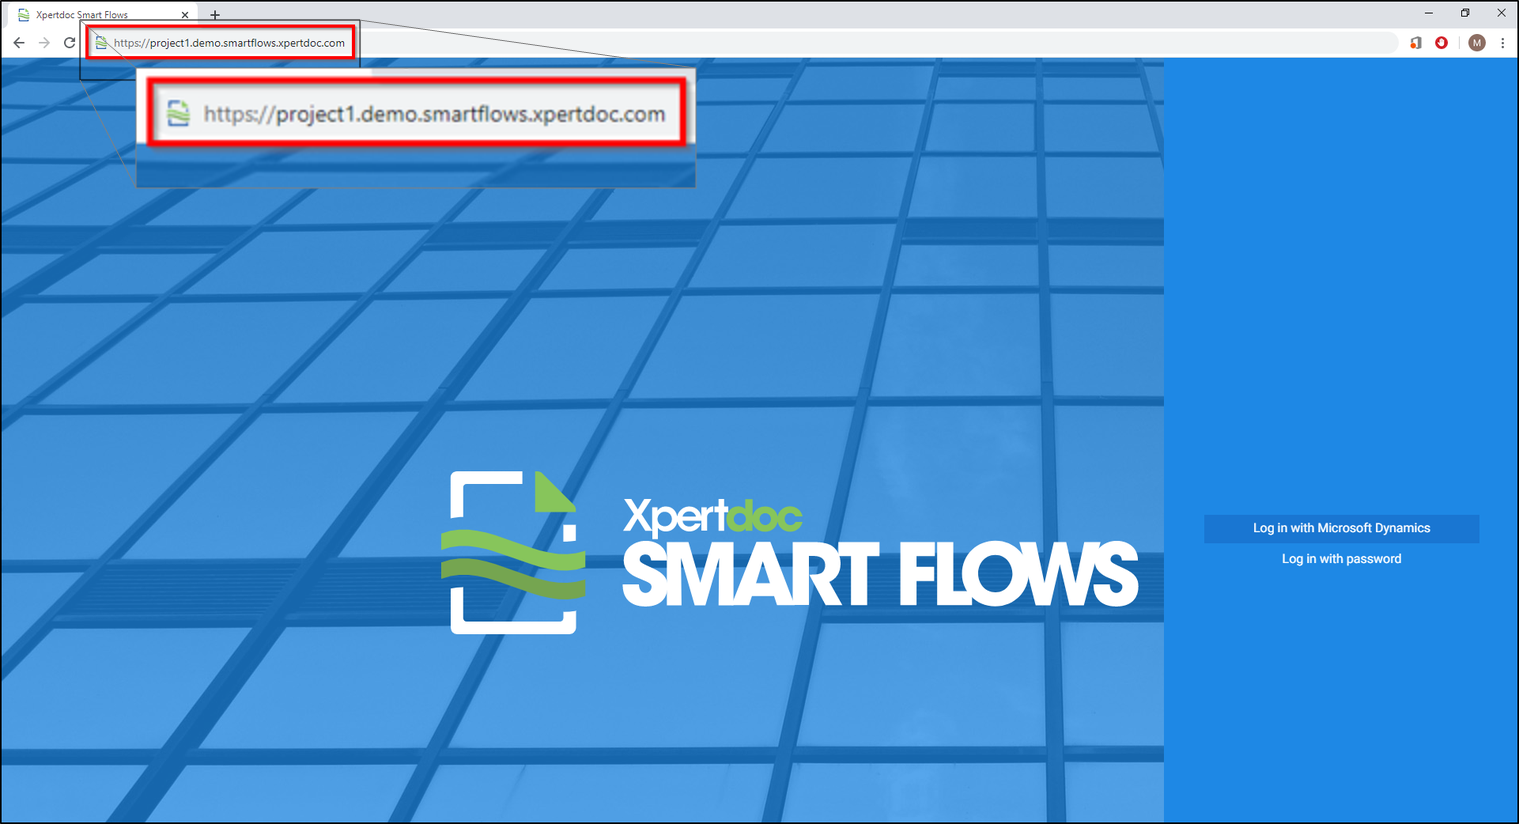
You can locate your Smart Flows server URL in your application.properties file. The Smart Flows server value is set by the project.baseurl element.
| 1. | In your browser’s address bar, copy and paste the URL for Smart Flows server. |
| 2. | (Optional) Add the port number after your Smart Flows server URL if you are not using the default port number. |
The login page for your Smart Flows instance displays.
| 3. | Login with admin credentials stored in your application.properties file. |
| 3.1. | Select the login in with log in with password option. |
| 3.2. | Enter admin for the username. |
| 3.3. | Enter the password specified in the application.properties file. |
| 3.4. | Select the login button. |
Upon logging in, the system prompts you to change the admin password.
| 4. | Follow the wizard’s guidance for changing the password. |
If you do not delete the sample.user.password value, it will overwrite your attempts to change the admin password.
| 5. | After you have changed the password for the admin user, navigate to your application.properties file and delete the sample.user.password value. |
You’ve successfully started your Smart Flows service and you can now install the Template Builder word-add-in. Please refer toInstalling Template Builder for more information.
Creating the SQL Server Database
The SQL Server database actively stores and retrieves data requested by other applications within your system, even if those applications aren’t on the same machine. Creating the SQL Server database allows Smart Flows to access your existing data.
After the 4.24.0 release of Smart Flows, we introduced changes to SQL Server compatibility and configuration. Users upgrading from an earlier version must carefully review the Java Database Connectivity(JDBC![]() Java Database Connectivity is an application programming interface for the Java programming language, which defines how a client may access a database. It is a Java-based data access technology used for Java database connectivity. It is part of the Java Standard Edition platform, from Oracle) connection string updates to ensure the application properties is updated as expected. See Installing Smart Flows Server On Premise and Creating the SQL Server Database.
Java Database Connectivity is an application programming interface for the Java programming language, which defines how a client may access a database. It is a Java-based data access technology used for Java database connectivity. It is part of the Java Standard Edition platform, from Oracle) connection string updates to ensure the application properties is updated as expected. See Installing Smart Flows Server On Premise and Creating the SQL Server Database.
Configure SQL Server for Smart Flows
The database's name should reflect the environment's role. The name after Smart Flows (smart flow-database name) indicates the database's name and function.
Use SSMS to Configure SQL Server for Smart Flows
Follow these steps to create a database and a native user using SQL Server Management Studio (SSMS):
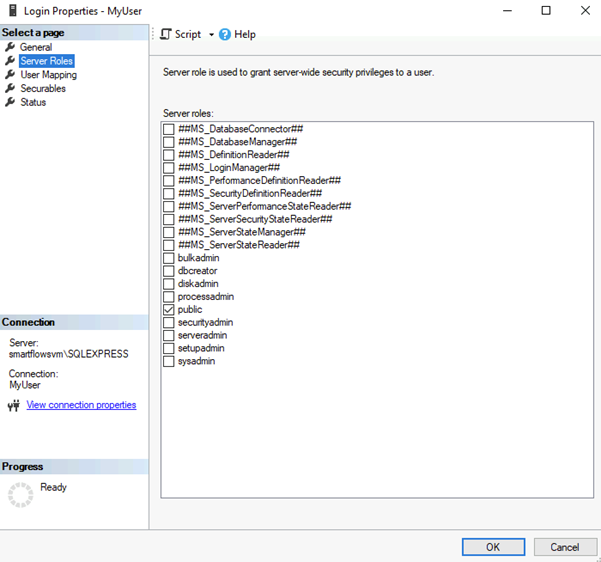
Only the public role membership is necessary.
| 1. | From the Object Explorer, right-click the Databases folder and select New Database. |
| 2. | Right-click the Security folder in Object Explorer and select New Login.... |
| 3. | Create the login with the necessary credentials. |
| 4. | To create a database user: |
| 4.1. | Right-click the Users folder under the target database and select New User.... |
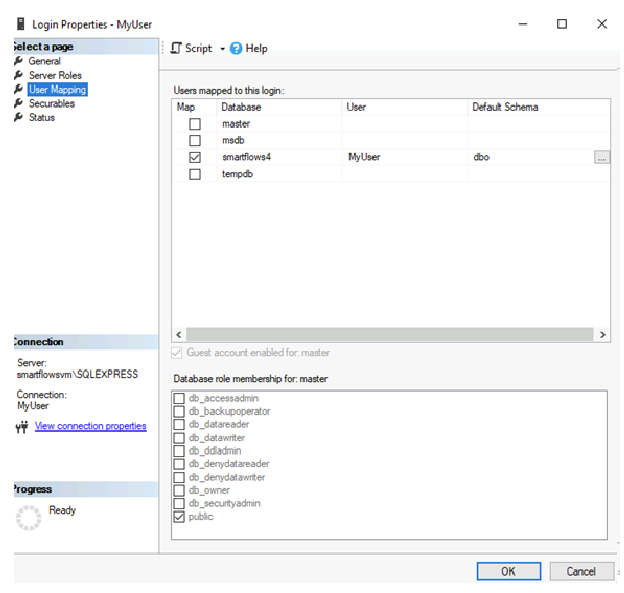
| 4.2. | Map the login created for this user by selecting User Mappings and choosing the created database. |
Use T-SQL to Configure SQL Server
Alternatively, you can use Transact-SQL (T-SQL) to configure SQL Server:
To create a database:
To create a login:
To create a database user:
Enabling Connectivity and Authentication
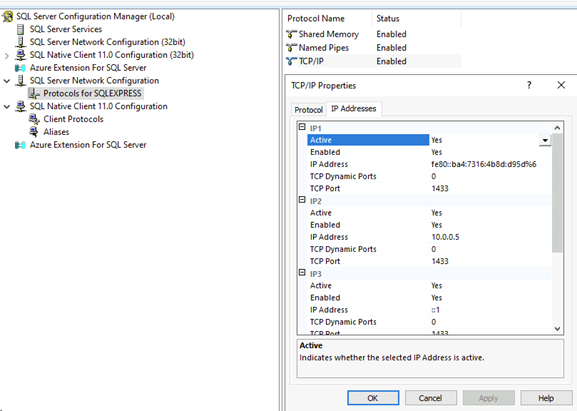
Enable TCP/IP Connection
To enable TCP/IP connections for SQL Server:
| 1. | Open SQL Server Configuration Manager. |
| 2. | Expand SQL Server Network Configuration and select Protocols for MSSQLSERVER. |
| 3. | Right-click the TCP/IP protocol and select Enable. |
| 4. | Right-click again, select Properties and enter port number 1433 for each listed IP address. |
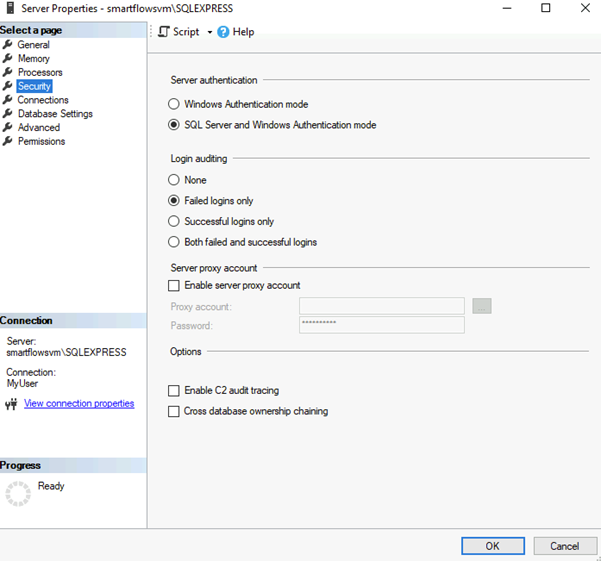
Set Authentication Mode
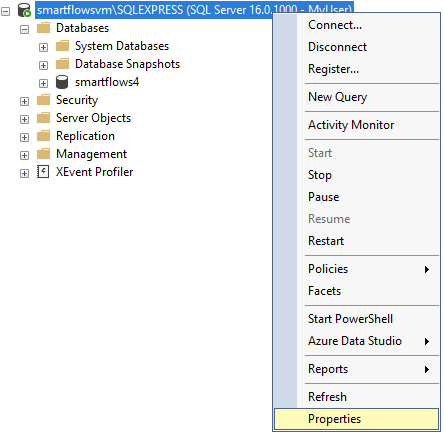
To set authentication mode:
| 1. | In SSMS, right-click on the server instance and select Properties. |
| 2. | Go to Security and set Server Authentication to SQL Server and Windows Authentication mode. |
Ensure your JDBC connection string follows security best practices. With the latest SQL Server driver, using trustServerCertificate is now optional. If you do not possess a trusted certificate, you can still establish a secure connection using trustServerCertificate=true, but only when necessary. Whenever possible, prioritize using a trusted certificate instead.
In the example below, the encrypt=false parameter is used because encryption is not enabled. Do not use this setting in a production environment or with real data.
trustServerCertificate is removed from the default examples. If you need to use it, add trustServerCertificate=true manually.
encrypt=true is strongly recommended to ensure data-in-transit is secured.
project.datasource.jdbc-url=jdbc:sqlserver://PRD-V-SQL-DB02;database=XprtDoc;encrypt=true;hostNameInCertificate=*.database.windows.net;loginTimeout=30;lockTimeout=5000;socketTimeout=300000SQL Server Security Best Practices
-
Enable encryption (encrypt=true): Ensures data is encrypted in transit between Smart Flows and the SQL Server.
-
Use Trusted Certificates: Whenever possible, install and use certificates trusted by the client’s machine. This removes the need for setting trustServerCertificate=true.
-
Limit Roles and Permissions: Only assign the required database roles (e.g., ‘public’) to service accounts used by Smart Flows.
-
Remove trustServerCertificate: trustServerCertificate is removed from the default examples. If you need to use it, add trustServerCertificate=true manually.
-
Enforce Encryption: encrypt=true is strongly recommended to ensure data-in-transit is secured.
-
Do Not Use Unencrypted Connections: In the example below, the encrypt=false parameter is used because encryption is not enabled. Do not use this setting in a production environment or with real data.
SQL Server Compatibility Considerations
Upgrading to the latest SQL Server driver may require adjustments to existing connection strings. To avoid connectivity issues, verify that your application.properties file or equivalent configuration reflects the updated JDBC parameters—especially regarding encryption and the optional trustServerCertificate parameter. If you previously relied on trustServerCertificate=true without a properly trusted certificate, be aware that you must either add a trusted certificate or explicitly set the parameter to true to maintain the same behavior.


