Installing Smart Flows Server On Premise
To download the server component (a zip file), you will need a Freshdesk account. You can request access through our Client and Support Operations team, or you will get it after purchasing the license. In Freshdesk, go to 'Knowledge base' -> Experlogix Smart Flows -> Smart Flows Downloads. Here is a direct link: https://support.experlogix.com/en/support/solutions/articles/12000098262-smart-flows-downloads. The two most popular methods of installing Smart Flows are:
-
The traditional install that installs Smart Flows on your computer
-
Using containers, such as Docker Desktop, which allows you to install Smart Flows in a container environment
We recommend using the AdoptOpenJDK 21 LTS build using the Hotspot VM, select here to download.
Please contact Experlogix Support if you need help in updating Java.
Install Smart Flows Using Traditional Method
Download the ZIP file. In File Explorer, Right-click the ZIP file. Then go to Properties. In the General tab, if there is a message here that says 'This file came from another computer and might be blocked to help protect this computer', then check 'Unblock' and press 'OK'.
Extract Server Installation Files
| 1. | Unpack the ZIP file in the installation folder (C:\Xpertdoc-SmartFlows\). |
| 2. | Rename the folder to be meaningful. |
Create the application.properties file
In the example below, the saved location is project-prod.
| 1. | In the project folder, create a blank text file and save it with the name application.properties. |
After upgrading or installing Smart Flows to version 4.24.0 or higher, the JDBC Driver will be on version JDBC Driver 12.6. This causes some changes in how you configure the JDBC properties in the application.properties file compared to previous versions:
-
trustServerCertificate=true is now optional and should only be used when a trusted certificate is unavailable.
-
Use encrypt=true whenever possible to ensure secure connections.
-
Verify that your application.properties file includes a valid connection string as outlined in the official Microsoft documentation.
project.datasource.jdbc-url=jdbc:sqlserver://PRD-V-SQL-DB02;database=XprtDoc;encrypt=true;hostNameInCertificate=*.database.windows.net;loginTimeout=30;lockTimeout=5000;socketTimeout=300000server.port=443
project.baseurl=https://xsfl-server:443server.ssl.key-store=../yourpfxfile.pfx
server.ssl.key-store-password=yourpfxpassword
server.ssl.key-store-type=pkcs12trustServerCertificate=false; should not be included unless the environment requires it.
-
New driver versions do not require this setting unless using self-signed or untrusted certificates.
-
If trustServerCertificate is still needed, it should be explicitly added (trustServerCertificate=true), but only if a trusted certificate is unavailable.
project.datasource.jdbc-url=jdbc:sqlserver://PRD-V-SQL-DB02;database=XprtDoc;encrypt=true;trustServerCertificate=false;
project.datasource.jdbc-url=jdbc:sqlserver://PRD-V-SQL-DB02;database=XprtDoc;encrypt=true;trustServerCertificate=false;
hostNameInCertificate=*.database.windows.net;loginTimeout=30;lockTimeout=5000;socketTimeout=300000
project.datasource.username=sa
project.datasource.password=secretsapasswordsample.user.password=secretadminpassword
# Uncomment when using HTTP instead of HTTPS:
# cookie.secure=falseTLS Certificate SetupThe use of TLS encryption is required for the Smart Flows system to function. To enable TLS encryption, you need a TLS Certificate that matches your FQDN.If you install multiple projects on one server, you can also use a wildcard certificate![]() a digital certificate that is applied to a domain and all its subdomains. Wildcard notation consists of an asterisk and a period before the domain name. Secure Sockets Layer (SSL) certificates often use wildcards to extend SSL encryption to subdomains. for the CN . For example *.base.domain.com with *base.domain.com and base.domain.com as alternative names. The "*base" component of the address serves as a "fill in the blank" to properly direct to all versions of the address that end in ".domain.com"SSL Certificate Format GuidelinesThe recommended format is PFX
a digital certificate that is applied to a domain and all its subdomains. Wildcard notation consists of an asterisk and a period before the domain name. Secure Sockets Layer (SSL) certificates often use wildcards to extend SSL encryption to subdomains. for the CN . For example *.base.domain.com with *base.domain.com and base.domain.com as alternative names. The "*base" component of the address serves as a "fill in the blank" to properly direct to all versions of the address that end in ".domain.com"SSL Certificate Format GuidelinesThe recommended format is PFX![]() PKCS #12 defines an archive file format for storing many cryptography objects as a single file. It is commonly used to bundle a private key with its X.509 certificate or to bundle all the members of a chain of trust.The Certificate must be validYou must have the PFX password availableStore the PFX file inside the installation folder (e.g. C:\Experlogix-Smart Flows).
PKCS #12 defines an archive file format for storing many cryptography objects as a single file. It is commonly used to bundle a private key with its X.509 certificate or to bundle all the members of a chain of trust.The Certificate must be validYou must have the PFX password availableStore the PFX file inside the installation folder (e.g. C:\Experlogix-Smart Flows).
| 2. | Update the following parameters according to your setup. |
#the address of your Smart FlowsXSF![]() Flavour in Licensing is related to connectors. For Smart Flows you have the following connector options under Flavour section: Microsoft Dynamic 365 CE, Mocrosoft Dynamic 365 F&O, Salesforce, and Sugar server as seen by the end-user (include port number if not using default port).
Flavour in Licensing is related to connectors. For Smart Flows you have the following connector options under Flavour section: Microsoft Dynamic 365 CE, Mocrosoft Dynamic 365 F&O, Salesforce, and Sugar server as seen by the end-user (include port number if not using default port).
project.baseurl=http://exampleurl.be
#Location of the PFX file
server.ssl.key-store=examplepfx.pfx
#Password of the PFX file
server.ssl.key-store-password=enteryourpasswordhere
#Do not change, use this value
server.ssl.key-store-type=pkcs12
#Example JDBC URL
project.datasource.jdbc-url=jdbc:sqlserver://PRD-V-SQL-DB02;database=XprtDoc;encrypt=true;hostNameInCertificate=*.database.windows.net;loginTimeout=30;lockTimeout=5000;socketTimeout=300000
#Username of the database user
project.datasource.username=myusername
#Password of the database user
project.datasource.password=mypassword
#Choose a password for your first login with the native admin user (It will be changed at the initial project setup)
sample.user.password=secretadminpassword
Configure JWT Token Settings

|
Property |
Description |
Required |
Value |
|---|---|---|---|
|
jwt.secret |
The secret is used when signing and validating JWTs provided by Smart Flows. |
No, but highly recommended). When not used, a random secret will be generated on startup. |
Randomly chosen Example: 1e38b0lMFqccDuOA The |
|
jwt.expiration |
The duration in seconds for which a JWT is valid. |
No | 86400 (= 24 hours) |
|
cookie.salt |
The value is used to encode cookie stamp. If not set, it will get generated on startup. This means all user sessions will be invalid on restart of the server. |
No |
Randomly chosen* Example: 797204 The |
For on-premise installation, the following list of properties can be added to the application.properties file.
Server properties
|
Property |
Description |
Required |
Default |
Since | Sensitive |
|---|---|---|---|---|---|
| server.port | The port Smart Flows uses. | No | 8080 | N/A | N/A |
| jwt.secret | The value to use as the secret when signing and validating JWTs provided by Smart Flows | No, but highly recommended | If not set, randomly generated at startup | N/A | X |
| jwt.expiration | The amount of seconds a JWT is valid | No | 86400 (= 24 hours) | N/A | N/A |
| cookie.expiration | The amount of seconds the authentication cookie is valid | No | 604800 (= 7 days) | N/A | N/A |
| cookie.secure | Whether the secure flag on the cookie is set to true or false | No | true | N/A | N/A |
| cookie.salt | Value used to encode the cookie stamp. If not set, it will be generated on startup. This means all user sessions will be invalidated on restart of the server. | No | If not set, randomly generated at startup | N/A | X |
| project.callbackbaseurl | The URL to use for plugins that want to use callbacks (e.g. DocuSign) | No | ${project.baseurl} | N/A | N/A |
| project.projecturl | The URL used to reach the Smart Flows Project Console | No | ${project.baseurl}/project | N/A | N/A |
| project.clienturl | The URL used to reach the Smart Flows Execution Panel | No | ${project.baseurl}/client | N/A | N/A |
| project.assetsurl | The URL for assets | No | ${project.baseurl}/assets | N/A | N/A |
| project.contactsurl | The URL to contact Experlogix Support | No | https://www.experlogix.com/contact-us/ | 4.19.0 | N/A |
| samplestore.url | The URL for the sample data store | No | none | N/A | N/A |
| project.http.cookies.ignore.all | Whether or not to disable cookie management on HTTP connections. If true, the value of project.http.cookies.ignore is not considered. | No | False | 4.7.2 | N/A |
| project.http.cookies.ignore | A comma-separated list with names of cookies that should be ignored | The names are case-insensitive. | No <empty list> | 4.7.2 | N/A |
| logging.api.enable | Enable api request/response logging. This enables 2 extra loggers. All requests/responses are logged in "com.xperido.api.request". The bodies of the requests/responses are logged separately to "com.xperido.api.request.body". | No | false | 4.9.0 | N/A |
| project.cors.extraAllowedOrigins | Add extra entries to the CORS filter allowed origins list (comma-separated list) | No | N/A | 4.12 | N/A |
| project.cors.extraAllowedHeaders | Add extra entries to the CORS filter allowed headers list (comma-separated list) | No | N/A | 4.12 | N/A |
| project.cors.extraExposedHeaders | Add extra entries to the CORS filter exposed headers list (comma-separated list) | No | N/A | 4.12 | N/A |
| project.import.archivettl | blank | N/A | 900 | N/A | N/A |
| project.import.savearchiveindb | blank | N/A | N/A | N/A | N/A |
Database properties
Database properties define the connection to the project database. In a multi-tenant setup, this refers to the template database, which serves as the blueprint for all tenant project databases.
|
Property |
Description |
Required |
Default v |
Since | Sensitive |
|---|---|---|---|---|---|
| project.datasource.jdbc-url | The JDBC URL for the project database | Yes | N/A | N/A | N/A |
| project.datasource.username | The username for the project database | Yes | N/A | N/A | N/A |
| project.datasource.password | The password for the project database | Yes | N/A | N/A | X |
| project.datasource.* | Additional database properties, as described here | No | N/A | N/A | N/A |
Single tenant properties
| Property | Description |
Required |
Default |
Since |
Sensitive |
|---|---|---|---|---|---|
| project.baseurl | The base URL Smart Flows can be reached at | No | http://localhost:${server.port} | blank | blank |
| project.tenant | The tenant name, if part of a hybrid multi-tenant setup | No | blank | blank | blank |
| project.name | The name to use as the project name | No | blank | blank | blank |
| project.description | The description for the project | No | blank | blank | blank |
| sample.user.password | The password for the admin user, if not already configured in the database. If set, it has to comply with password policy. | No | blank | blank | X |
Password reset properties
In order to enable password reset via e-mail, make sure at least the forgotpassword.smtp.server property is set.
| Property | Description | Required | Default | Since | Sensitive |
|---|---|---|---|---|---|
| forgotpassword.smtp.server | The IP or hostname of an SMTP server thatsends the emails | Yes | N/A | N/A | N/A |
| forgotpassword.smtp.port | The port used to reach the SMTP server | No | 25 | N/A | N/A |
| forgotpassword.smtp.from.name | The name to use as the sender of the email (e.g. Xpertdoc Smart Flows) | No | N/A | N/A | N/A |
| forgotpassword.smtp.from.address | The email address to use as the sender (e.g. smartflows@xpertdoc.com) | Yes | N/A | N/A | N/A |
| forgotpassword.smtp.username | The username to authenticate to the SMTP server | No | N/A | N/A | N/A |
| forgotpassword.smtp.password | The password to authenticate to the SMTP server | No | N/A | N/A | X |
| forgotpassword.smtp.encryption |
The encryption type to use when connecting to the SMTP server: * None * SslTls * StartTls |
No | None | N/A | N/A |
| forgotpassword.expiration.minutes | The number of minutes a password reset token is valid | No | 30 | N/A | N/A |
| project.forgotpassword.email.template | The email HTMLtemplate to use | No | Embedded template | N/A | N/A |
| project.forgotpassword.email.subject | N/A | N/A | N/A | N/A | N/A |
If resetting the password via SMTP fails, generate a 2a2a BCrypt hash (e.g., using an online tool) and update the existing password by running the following query, replacing <hash> and <username> with the appropriate values.
UPDATE xd_user_native SET password_hash = '<hash>' WHERE xd_user_id = (SELECT xd_user_id FROM xd_user WHERE user_name = '<username>')
Password policy
| Property | Description | Required | Default | Since |
Sensitive |
|---|---|---|---|---|---|
| password.policy.strength |
The required strength of a password. This strength adds up to the number of rules. 0: password is a required value 1: password has a required minimum length (see password.policy.length) 2: password needs at least one number 3: password needs at least one lowercase & one uppercase 4: password needs at least one special character 5. password has to be different from the previous one 6: certain values are not allowed to be part of the password (username, projectname, etc.) |
No | 0 | 4.4.0 | N/A |
| password.policy.minlength | The minimum length of the password | No | 8 | 4.4.0 | N/A |
reCAPTCHA
| Property | Description | Required | Default | Since | Sensitive |
|---|---|---|---|---|---|
| recaptcha.sitekey |
If defined, injects an invisible reCAPTCHA v2 on the login button for username/password login (https://developers.google.com/recaptcha/docs/invisible ) You can get a sitekey/secret per domain at: |
No | null | 4.4.0 | N/A |
| recaptcha.secret | The secret part of the key pair mentioned above | No | null | 4.4.0 | X |
Import legacy projects
| Property | Description | Required | Default | Since | Sensitive |
|---|---|---|---|---|---|
| import.legacy.document.name.editable.disabled |
When set to true, the document name of the generate document step in the flow that's generated from the XperiDo template, is never user editable. When set to false, the setting on the template is used. |
No | false | 4.7.0 | N/A |
| import.legacy.document.name.editable.required | When set to true and the document name of the generate document step in the flow that's generated from the XperiDo template is user editable, the user editable field is required. When set to false, the user editable field is not required. | No | true | 4.7.0 | N/A |
| import.legacy.document.name.timestamp.disabled | When set to true, there will never be a timestamp appended to the document name in the generate document step in the flow that's generated from the XperiDo template. When set to false, the setting from the template is used. | No | false | 4.7.0 | N/A |
Cleanup Properties
| Property | Description | Required |
Default |
Since | Until |
Sensitive |
|---|---|---|---|---|---|---|
| project.cleanup.paging.enabled | Whether to enable paged cleanup for flow executions or not. | No | true | 4.9.0 | N/A | N/A |
| project.cleanup.paging.pagesize | Pagesize in which the flow executions and depedencies will be deleted | No | 2000 | 4.9.0 | N/A | N/A |
| project.cleanup.documents.paging.pagesize | Pagesize in which documents will be deleted | No | 50 | 4.8.0 | N/A | N/A |
| project.cleanup.documents.paging.threshold.MB | Once the size of flow execution documents surpasses this threshold, cleanup will be done paged. | No | 1024 | 4.8.0 | N/A | N/A |
| project.cleanup.delay.between.page | Delay between paged deletes, to give the database some extra time (ms) to process queries | No | 50 | N/A | N/A | N/A |
Miscellaneous
| Property | Description | Required | Default | Since | Until | Sensitive |
|---|---|---|---|---|---|---|
| project.tokens.margin | The value that is used as an extra buffer for access token lifetimes in seconds. The value is subtracted from the lifetime that is given back by the server and the result is used as the actual lifetime of the token in the internal cache. | No | 5 | N/A | N/A | N/A |
| project.rssfeed | N/A | N/A | N/A | N/A | N/A | N/A |
| project.supporturl | N/A | N/A | N/A | N/A | N/A | N/A |
| project.esignprovider | N/A | No | first licensed plugin supporting esign | N/A | N/A | N/A |
| install.folder | Absolute path where Smart Flows is installed. | No | Location of smart flows jar | N/A | N/A | N/A |
| password.vault.jasypt.prefix | Values encrypted using jasypt should be enclosed between password.value.jasupt.prefix and password.vault.jasypt.suffix | No | ENC( | N/A | N/A | N/A |
| password.vault.jasypt.suffix | Values encrypted using jasypt should be enclosed between password.value.jasupt.prefix and password.vault.jasypt.suffix | No | ) | N/A | N/A | N/A |
| project.workfiles.root | Absolute path used to create temporary work files. | No | /temp/workroot. When running on windows, / will be resolved to the drive where the smart flows jar is located | N/A | N/A | N/A |
| project.workfiles.maintain | When true, work files won't be deleted after use | No | false | N/A | N/A | N/A |
| project.simulatecleanup | When true, reports will not be removed from the database when cleanup is triggered by the scheduler but logging of what would be removed, is generated. | No | false | N/A | N/A | N/A |
| project.exposelocalprinters | Whether to make the printers that are installed on the machine Smart Flows is installed on available in Smart Flows | No | false | N/A | N/A | N/A |
| project.ui.languages | Available UI languages | No | en | N/A | N/A | N/A |
| project.system.language | Default project language | No | system default | N/A | N/A | N/A |
| project.system.timezone | Default project timezone | No | system default | N/A | N/A | N/A |
| flow.statistics.maxresults | Maximum number of results to retrieve when calculating execution statistics | No | 7 | N/A | N/A | N/A |
| flowrunner.pool.size | Maximum number of concurrent threads to execute a flow | No | number of available processors | N/A | N/A | N/A |
| flowrunner.queue.size | Maximum size of the queue for flow executions that need to be started | No | unlimited | N/A | N/A | N/A |
| flowrunner.timeout.enabled | When true, flow executions will be cancelled after being executed for more than flowrunner.timeout.seconds seconds | No | false | N/A | N/A | N/A |
| flowrunner.timeout.seconds | The maximum value a flow execution is allowed to run | No | 600 | N/A | N/A | N/A |
| flowrunner.timeout.seconds.multirecord | The maximum value a flow execution is allowed to run when it's ran for multiple records. The value defaults to 5x flowrunner.timeout.secords. The time an execution may take depends on the amount of records the flow is started for. | No | NA | N/A | N/A | N/A |
| data.sizelimit | Maximum size (approximated, number of characters) of data retrieved from a data source | No | unlimited | N/A | N/A | N/A |
| flowrunner.retry.seconds | If an execution is continued (because of user interaction or a callback fro man external service) and the execution is already running, the flow task executor will schedule a retry. This property defines how many seconds into the future this retry should occur. | No | 10 | 4.5.0 | N/A | N/A |
| flowrunner.retry.max.seconds | The upper bound value for flowrunner.retry.seconds. Should be between 10 and 86400 seconds (24 hours) | No | 1800 | 4.5.0 | N/A | N/A |
| i18n.folder | Folder to read i18n resources from | No | i18n (relative to install folder) | N/A | N/A | N/A |
| project.tokens.locking.manager |
Which locking mechanism to use to synchronize between different clustered smart flows instances. Value can be:
|
No | Database | N/A | N/A | N/A |
| project.tokens.locking.timeout | The timeout (in milliseconds) to use when trying to get a lock using the internal locking mechanism | No | 30000 |
N/A |
N/A | N/A |
| fetchdocument.defaultname | The default displayName for documents from external systems | No | Document from <connector> | 4.4.0 | N/A | N/A |
| project.breadthlimit.max | Maximum number of records retrieved when following a 1-N relation when retrieving data for a sample | No | unlimited | 4.4.0 | N/A | N/A |
| project.breadthlimit.editable | If set to true, makes the above limit editable per sample in the UI | No | false |
NA |
N/A | N/A |
| notifications.showall |
When set to false, none-critical notifications are not shown. These include Flows that are waiting for input |
No | true | 4.4.0 | N/A | N/A |
| project.executionstate.locking.timeout | When a flow execution is started/continued it will now try to get an exclusive lock on the execution state. This is the timeout (in milliseconds) to use when trying to get a lock using the internal locking mechanism. | No | 3000 | 4.5.0 | N/A | N/A |
| project.db.limit.in | The maximum amount of entries used in an SQL IN statement when checking which users are already synced to the database. The JPA library (Hibernate) we are using limits the amount of elements in an IN-statement to 2100. This is a hard limit, so going over this amount will result in the functionality not working. | No | 2000 | 4.6.2 | N/A | N/A |
| project.license.activation.hourofday | The hour of the day the daily license activation check is scheduled. See also 37686 Use the Xpertdoc licensing server for licenses.Closed | No | 23 | 4.11.0 | N/A | N/A |
| project.license.activation.daysbefore | The number of days before a current license activation end the license activation schedule should actually try to reactivate the license. | No | 5 | 4.11.0 | N/A | N/A |
| image.format.parameters.jpeg.compressionQuality |
Value between 0.0 and 1.0 where 1.0 is maximum quality, minimum compression, while 0.0 is minimum quality, maximum compression. When not specified, the quality of jpeg input images will not be changed while other-format images will be using 1.0. |
No | Maintain current / 1.0 | 4.11.0 | N/A | N/A |
| project.document.merge.embed | Whether or not to embed PDF documents that need to be inserted into a generated document at the time the generated document is converted to PDF, into the generated document itself (docx). | No | True | 4.12.0 | N/A | N/A |
| project.objectmapper.fail.unknown.props | N/A | N/A | False | N/A | N/A | |
| project.flow.progress.defaultTimeout | The default timeout for a get progress call to the /flows/executions/{executionid}/progress endpoint | No | unlimited | 4.20.6 | N/A | N/A |
| branding.settings.logoFileSizeLimit | The file size limit for the logos in Branding Settings. | No | 512000 | 4.23.3 | N/A | N/A |
| branding.settings.validFileTypes | The valid file types for the logos in Branding Settings. | No | png, svg, jpeg, jpg | 4.23.3 | N/A | N/A |
| csp.header.{{directive}} | The value for the CSP header - per directive. Multiple directives can be combined and will be concatenated. | No | csp.header.form-action='self' | 4.24.0 | N/A | N/A |
General properties
| Property | Description | Required | Default | Since | Sensitive |
|---|---|---|---|---|---|
| socket.readTimeout | The maximum number of milliseconds a socket read instruction can last | No | No timeout | N/A | N/A |
| socket.connectTimeout | The maximum number of milliseconds creating a socket connection can last | No | No timeout | N/A | N/A |
| socket.connectionRequestTimeout | The maximum number of milliseconds requesting a socket connection from the connection manager can last | No | No timeout | N/A | N/A |
| socket.cookieSpec |
Determines the name of the cookie specification to be used for HTTP state management. One of:
|
No | standard | 4.10 | N/A |
| socket.maxConnPerRoute | The maximum number of connections per route for each connection manager | No | 5 | N/A | N/A |
| socket.maxConnTotal | The maximum number of connections for each connection manager | No | 10 | N/A | N/A |
| socket.keepAlive | The maximum amount of seconds to keep a socket alive | No | 240 | N/A | N/A |
| httpclient.closeidleconnections.interval | Check every x seconds to see if there are idle or stale connections which can be closed. Also logs statistics if configuredsee later. | N/A | 30 | N/A | N/A |
| httpclient.manager.forceshutdown | Force close the connection manager even if there are connections in use (in seconds) | N/A | 300 | N/A | N/A |
| document.info.threshold.time.seconds | Set the minimum time in seconds on which you will get a info message about the time it took to compile a template and generate the document | No | 10 | 4.15.x | N/A |
(Optional) Setup Docusign Connector
If you want to configure Docusign, you need to make changes to the application.properties file. Refer to Docusign (E-sign) connector set up for more details.
Create the Smart Flows service
Create the Smart Flows service. Open the command prompt as Administrator. Go into the installation folder via the cd command.
Run this command to create the Smart Flows service:
C:\...>smartflows-server install
You should see no error message:
The service has been created. You can start and stop Smart Flows here:

Update smartflows-server.xml Configuration
The file can be found in the project folder. Update the content of the file to reflect role of the server.
<service>
    <id>smartflows-server</id>
    <name>Xpertdoc Smart Flows Server</name>
    <description>Xpertdoc Smart Flows Server</description>
    ...
</service>
To differentiate multiple Smart Flows servers on the same machine, change the service parameters as follows:
| 1. | Rename the service id from ‘smartflows-server’ to ‘smartflows-prod’. |
| 2. | Rename the service name to ‘Xpertdoc Smart Flows Prod’. |
Install Smart Flows using Docker
If you prefer containerized deployment, you can use Docker to install Smart Flows in a more modular and scalable environment. This section walks through editing Docker files and executing Docker build commands.
Prerequisites:
Docker for Windows, Notepad ++
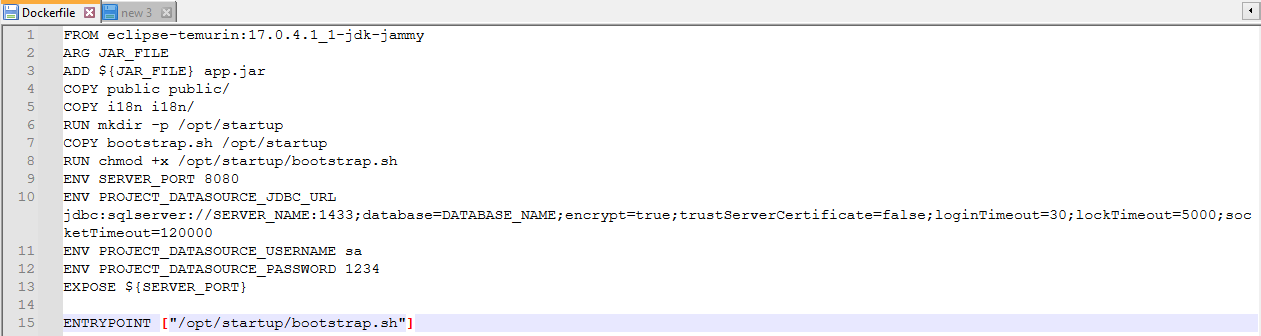
| 1. | Download the Docker zip file and extract. All properties normally in the application.properties file must now be listed in the Dockerfile. |
| 2. | Using Notepad ++, edit the Docker file. Use capital letters and underscore instead of period. |
You must use capital letters and underscores instead of periods for Docker to read the file.
| 3. | Unzip the server component zip file and place the unzipped files with the Docker files. |
| 4. | From the command line go to your current location and type: |
Ensure your Smart Flows server version matches your actual server version.
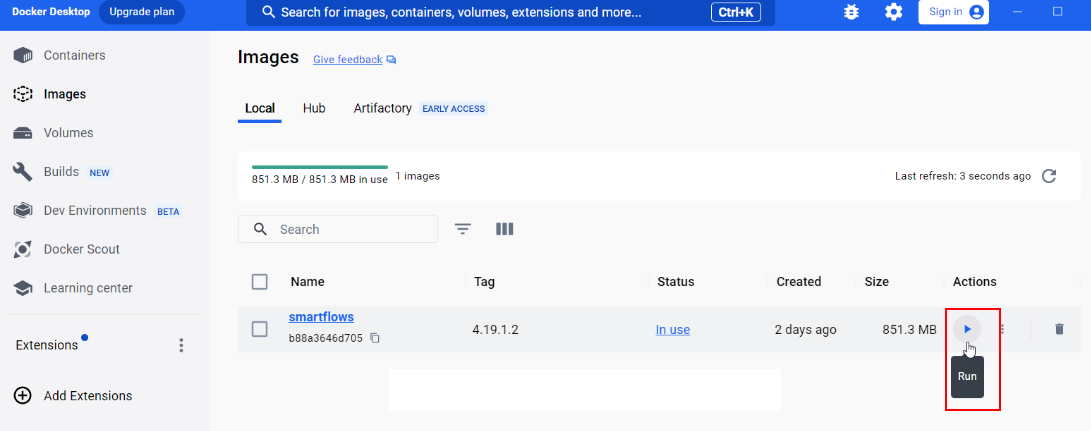
docker build . --build-arg JAR_FILE=smartflows-server-4.19.1.2.jar -t smartflows:4.19.1.2| 5. | From the Docker Desktop, select the Run button. |
Smart Flows opens in the Docker container.