Trigger Power Automate from Smart Flows
This tutorial explains how to trigger a Microsoft Power Automate flow from Experlogix Smart Flows. You’ll configure a flow to receive JSON payloads and update records in Microsoft Dynamics 365 CE. This integration allows automation of data operations like saving form input or data set values back to the your connector without user intervention.
Scenario
Contoso Solutions wants to automatically update customer account records in Microsoft Dynamics 365 CE whenever users submit a form in Smart Flows. Specifically, when a user completes a Smart Form with an updated account description, the system should trigger a Power Automate flow that receives the data and updates the correct account record in Microsoft Dynamics 365 CE.
To achieve this, you’ll:
-
Build a flow in Power Automate that accepts HTTP POST requests.
-
Configure the flow to update an account using dynamic content.
-
Connect Smart Flows to Power Automate using an HTTP connector.
-
Trigger the flow automatically during flow execution.
Resources Needed
-
Access to Microsoft Power Automate
-
A configured Microsoft Dynamics 365 CE environment with the Accounts entity available
-
An existing Smart Flows project where you can add and configure flow blocks
-
A sample JSON payload containing the id and description fields
-
The auto-generated flow URL from Power Automate (triggered by saving the flow)
-
An HTTP connector in Smart Flows set up with the base path from the flow URL
Procedure
| 1. | In Power Automate, create a new Instant cloud flow. |
| 2. | As a trigger, select When a HTTP requested is received. |
| 3. | In the When a HTTP request is received trigger, use the Use sample payload to generate schema option to create the JSON body. You'll need to provide a sample JSON payload in that process, see below for details. |
For instance, if you want to update the description of an account, the JSON payload could be something like this:
{
"account": {
"id": "",
"description": "Test YM"
}
}
By using the 'Generate from sample', the sample JSON payload will be wrapped and look like this:
{
"type": "object",
"properties": {
"account": {
"type": "object",
"properties": {
"id": {
"type": "string"
},
"description": {
"type": "string"
}
}
}
}
}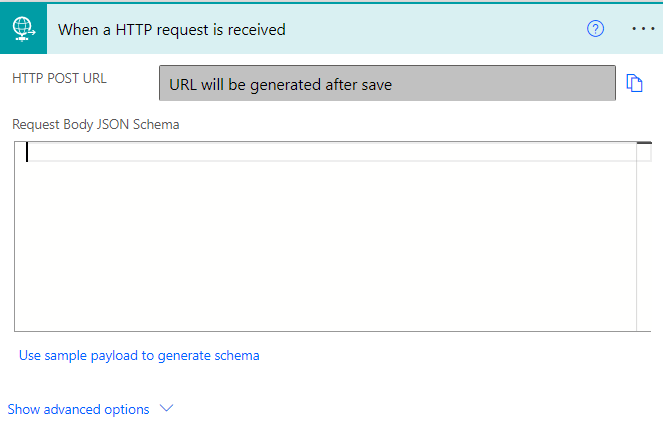
You'll notice that the HTTP POST URL is empty at this point. It is automatically generated after you save the flow.
The best way to update a record in Microsoft Dynamics 365 CE is to use the Common Data Service action.
| 4. | Select on + New Step to add a new step. |
| 5. | Search for and select the Update a record action. |

| 6. | On the Update a record action, configure the following parameters. |
| 6.1. | Select an environment. |
| 6.2. | Specify the Entity Name (i.e., Accounts). |
| 6.3. | Set the Record Identifier. |
In our example, the id comes from our JSON payload, and we'll use dynamic content to set it.
| 7. | Update any fields in the account. For each field, use Dynamic Content from the JSON payload to map the parameters. |

| 8. | Select the Save button to save your flow. |
| 9. | After you save the flow, go back to the first step and copy the auto-generated URL. You'll need it later. |
Example URL: https://prod-112.wesus.logic.azure.com:443/workflows/259e4eb6e54b46cfb5f2f34e921788ae/triggers/manual/paths/invoke?api-version=2016-06-01&sp=%2Ftriggers%2Fmanual%2Frun&sv=1.0&sig=lfaW4YgKQUa_Nml-Dk8T6Enz0Lnhn-4aeQd8qoVQopw
Example Base Path: "https://prod-112.westus.logic.azure.com:443
| 10. | In the Smart Flows Project Console, create a new Http(s) connector. For the base path, set it using the first part of the URL grabbed in the previous step. |
| 11. | Set the Authentication type to None. |
| 12. | Leave the other values empty. |
| 13. | Save the HTTP connector in Smart Flows. |
| 14. | In your flow in Smart Flows, add an HTTP request with HTTP Connector flow block. |
| 15. | Configure the flow block to use the HTTP connector you created. |
| 15.1. | For the Path attribute, copy the remaining portion of the URL (i.e., starting at "/workflows/......"). |
| 15.2. | Set the Method as POST. |
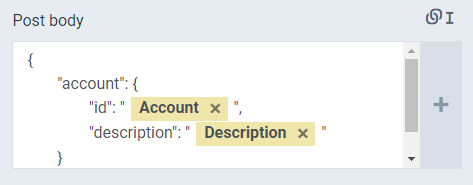
| 15.3. | For the Post Body, add a JSON payload. You can use the linked field to dynamically set values from any data set. |
| 16. | Save your flow in Smart Flows. |
Next Steps
Congratulations, you’ve configured the system so that each time the flow executes in Smart Flows, the system performs an HTTP request to Power Automate.