Creating the SQL Server Database
The SQL Server database actively stores and retrieves data requested by other applications within your system, even if those applications aren’t on the same machine. Creating the SQL Server database allows Smart Flows to access your existing data.
After the 4.24.0 release of Smart Flows, we introduced changes to SQL Server compatibility and configuration. Users upgrading from an earlier version must carefully review the Java Database Connectivity(JDBC![]() Java Database Connectivity is an application programming interface for the Java programming language, which defines how a client may access a database. It is a Java-based data access technology used for Java database connectivity. It is part of the Java Standard Edition platform, from Oracle) connection string updates to ensure the application properties is updated as expected. See Installing Smart Flows Server On Premise and Creating the SQL Server Database.
Java Database Connectivity is an application programming interface for the Java programming language, which defines how a client may access a database. It is a Java-based data access technology used for Java database connectivity. It is part of the Java Standard Edition platform, from Oracle) connection string updates to ensure the application properties is updated as expected. See Installing Smart Flows Server On Premise and Creating the SQL Server Database.
Configure SQL Server for Smart Flows
The database's name should reflect the environment's role. The name after Smart Flows (smart flow-database name) indicates the database's name and function.
Use SSMS to Configure SQL Server for Smart Flows
Follow these steps to create a database and a native user using SQL Server Management Studio (SSMS):
Only the public role membership is necessary.
| 1. | From the Object Explorer, right-click the Databases folder and select New Database. |
| 2. | Right-click the Security folder in Object Explorer and select New Login.... |

| 3. | Create the login with the necessary credentials. |
| 4. | To create a database user: |
| 4.1. | Right-click the Users folder under the target database and select New User.... |
| 4.2. | Map the login created for this user by selecting User Mappings and choosing the created database. |

Use T-SQL to Configure SQL Server
Alternatively, you can use Transact-SQL (T-SQL) to configure SQL Server:
To create a database:
To create a login:
To create a database user:
Enabling Connectivity and Authentication
Enable TCP/IP Connection
To enable TCP/IP connections for SQL Server:
| 1. | Open SQL Server Configuration Manager. |
| 2. | Expand SQL Server Network Configuration and select Protocols for MSSQLSERVER. |

| 3. | Right-click the TCP/IP protocol and select Enable. |
| 4. | Right-click again, select Properties and enter port number 1433 for each listed IP address. |

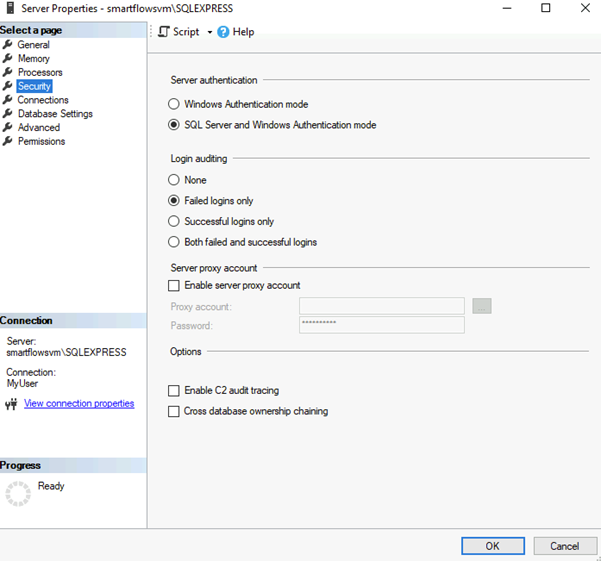
Set Authentication Mode
To set authentication mode:
| 1. | In SSMS, right-click on the server instance and select Properties. |
| 2. | Go to Security and set Server Authentication to SQL Server and Windows Authentication mode. |
Ensure your JDBC connection string follows security best practices. With the latest SQL Server driver, using trustServerCertificate is now optional. If you do not possess a trusted certificate, you can still establish a secure connection using trustServerCertificate=true, but only when necessary. Whenever possible, prioritize using a trusted certificate instead.
In the example below, the encrypt=false parameter is used because encryption is not enabled. Do not use this setting in a production environment or with real data.

trustServerCertificate is removed from the default examples. If you need to use it, add trustServerCertificate=true manually.
encrypt=true is strongly recommended to ensure data-in-transit is secured.
project.datasource.jdbc-url=jdbc:sqlserver://PRD-V-SQL-DB02;database=XprtDoc;encrypt=true;hostNameInCertificate=*.database.windows.net;loginTimeout=30;lockTimeout=5000;socketTimeout=300000SQL Server Security Best Practices
-
Enable encryption (encrypt=true): Ensures data is encrypted in transit between Smart Flows and the SQL Server.
-
Use Trusted Certificates: Whenever possible, install and use certificates trusted by the client’s machine. This removes the need for setting trustServerCertificate=true.
-
Limit Roles and Permissions: Only assign the required database roles (e.g., ‘public’) to service accounts used by Smart Flows.
-
Remove trustServerCertificate: trustServerCertificate is removed from the default examples. If you need to use it, add trustServerCertificate=true manually.
-
Enforce Encryption: encrypt=true is strongly recommended to ensure data-in-transit is secured.
-
Do Not Use Unencrypted Connections: In the example below, the encrypt=false parameter is used because encryption is not enabled. Do not use this setting in a production environment or with real data.
SQL Server Compatibility Considerations
Upgrading to the latest SQL Server driver may require adjustments to existing connection strings. To avoid connectivity issues, verify that your application.properties file or equivalent configuration reflects the updated JDBC parameters—especially regarding encryption and the optional trustServerCertificate parameter. If you previously relied on trustServerCertificate=true without a properly trusted certificate, be aware that you must either add a trusted certificate or explicitly set the parameter to true to maintain the same behavior.