Upgrading your Existing Projects
Download the latest version of Smart Flows from Support Portal.
The credentials to this page will have been provided on the first installment of Smart Flows. If the credentials are lost you can initiate a password reset on the login page, should you not have an account, please contact our Customer Success Team to request an account.
|
1.
|
Stop Smart Flows Server |
|
1.1.
|
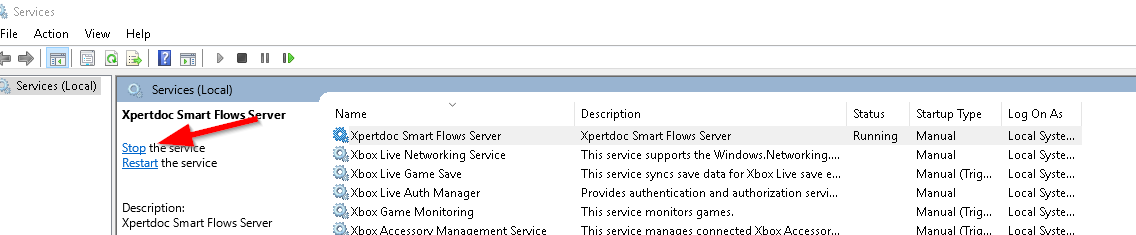
In the Service Management Console of your server, find the Smart Flows Server service and stop it. |
Just in case something would go wrong during the upgrade, it is re-assuring to have a backup of your project in it's current state.
|
2.1.
|
Backup your SQL Server database(s) |
|
2.2.
|
Move following folders and file to a backup directory |
|
2.3.
|
C:\Xpertdoc Smart Flows\project-prod\public\client |
|
2.4.
|
C:\Xpertdoc Smart Flows\project-prod\public\project |
|
2.5.
|
C:\Xpertdoc Smart Flows\project-prod\smartflows-server-<version>.jar |
|
3.1.
|
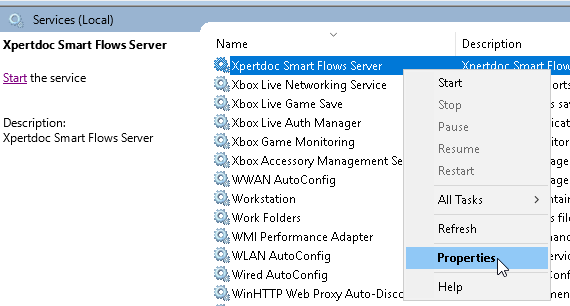
To retrieve the folder in which the ExperlogixSmart Flows Server service is installed, right-click ' Smart Flows Server' and select Properties. |
|
3.2.
|
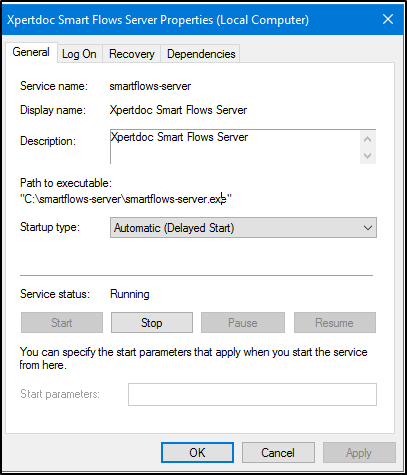
On the General tab, the path to the executable will indicate the install folder of the service. |
|
4.
|
Create a Copy of your Settings |
|
4.1.
|
Navigate to the Installation Folder you retrieved and create a local copy of these two files: |
-
application.properties
-
smartflows-server.xml
|
4.2.
|
Save the copies of these files somewhere safe. They contain your specific project settings, you don't want to overwrite these files in the upgrade process. |
|
5.
|
Download and Unzip the latest version of Smart Flows Server |
|
5.1.
|
Download the zip file with the target version as disclosed by Experlogix upon release of a new version. If you haven't received any updates and you believe you are eligible to receive them, please contact our Customer Success Team. |
|
5.2.
|
Unzip the archive to a regular folder: Right click -> "Extract here" |
|
6.
|
Replace the Installation Folder |
|
6.1.
|
Replace the Installation Folder with the folder you have just unzipped and copy your original application.properties and smartflows-server.xml files back into the new Installation Folder. |
|
6.2.
|
Update the smartflows-server.xml to have the last <startargument> element refer to the correct unpacked jar file (smartflows-install-<newversion>.jar) |
|
7.
|
Restart Smart Flows Server |
|
7.1.
|
Restart the " Smart Flows Server" service. This operation may take some time. |
Experlogix Smart Flows will automatically update your database.
In the logs you should see one of these entries:
Copy
2020-04-15 18:29:39.759   INFO 4076 --- [https-jsse-nio-10.118.32.4-443-exec-44] o.f.core.internal.command.DbMigrate      : Migrating schema [dbo] to version 67.1 - DocGenHistory
2020-04-15 18:29:39.801   INFO 4076 --- [https-jsse-nio-10.118.32.4-443-exec-44] o.f.core.internal.command.DbMigrate      : Migrating schema [dbo] to version 69 - PartialRevertV64
2020-04-15 18:29:39.847   INFO 4076 --- [https-jsse-nio-10.118.32.4-443-exec-44] o.f.core.internal.command.DbMigrate      : Successfully applied 72 migrations to schema [dbo] (execution time 00:04.759s)