Groups
Groups give you the power to display items in a loop in groups, instead of all together. This can be used for splitting content into e.g. product types, departments etc.
Concept
Grouping in Smart Flows is done by following these steps:
- Create a regular loop.
- Select the zone to group over. The loop should be in this zone.
- Select the field according to which you want to group the items. This is called the grouping field.
- Finalize the group.
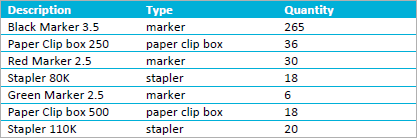
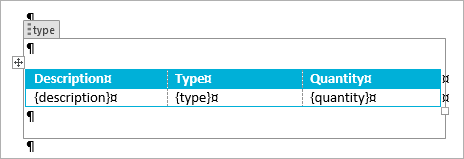
For instance, here's an ungrouped loop:
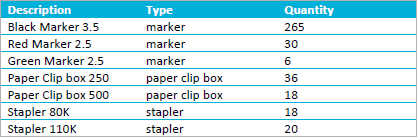
And here is the loop grouped according to type:
Group box
When you create a group in XperiDo, you are actually creating a group box. A group box designates the zone that should be repeated for every different value the grouping field has.
There are typically two ways to use the group box: embedded or separate. The difference lies in the position of the group box.
Embedded
An embedded group box is a group box that is placed directly around the loop box. Let's explain this with an example.
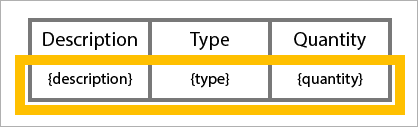
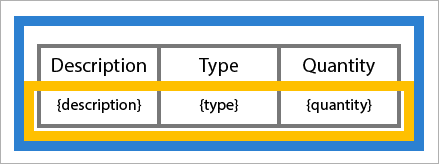
The following is a 2-row table with a loop box (in yellow) over the second row. This sets up the table for looping over the second row:
Creating a document from such a table will result in this:
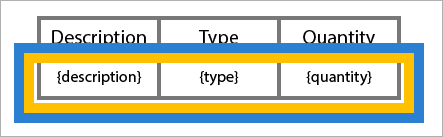
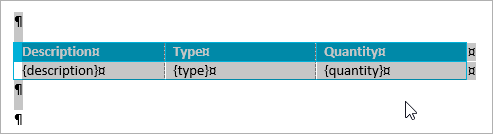
If we now put an embedded group box in there (in blue), we get the following scenario:
This is the output:
So, an embedded group box simply re-arranges the loop by grouping the items according to the grouping field.
An embedded group box is typically used when you want to sort a loop twice: once in the loop's settings and once using an embedded group box. This article explains in depth how to sort your loops twice.
Separate
A separate group box also works with a loop box, but it defines a larger area. The difference is that not just the loop will be grouped, but everything else inside the group box will also be repeated. Let's explain this with an example.
Here's a diagram of the table (loop box in yellow):
And here's the table with a separate group box (in blue) which fully encapsulates the table:
This results in the following:
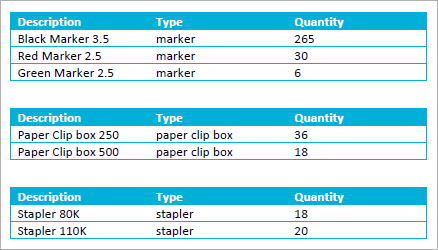
Because the group box included the entire table, the entire table is shown 3 times (since there are 3 types and type is the grouping field).
Creating a group
In order to create a valid group, you need to have a loop box ready around which you can create your group box.
| 1. | So, once you've set up your loop, follow these steps to set up your group: |
If you want to use an embedded group over a table row, be sure to select the row by hovering left to the row and clicking where the mouse pointer changes:

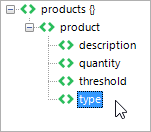
| 2. | In your data set, select the grouping field, which is the field according to which you want to group the items. |
| 3. | Select Group in the pane. |
A group box will now be inserted.
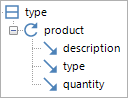
In the mapping tab of the pane, you'll see that the loop is inside the group.
Working with boxes
Since you're always using groups in combination with loops, it's a good idea to take a look at this article, which explains how to work with boxes - loop boxes, group boxes etc.
Special case: group without a loop
While unusual, you can create a group without having a loop. The result of doing this is that for each different value the group field has, one iteration is created. So if your field has 3 possible values but appears 7 times, the group will be repeated 3 times. This can come in handy when you are looking at displaying duplicates only once.
Group settings
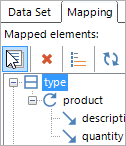
You can customize a group's settings to change its behaviour. To access these settings, select the group in the mapping tab and select Settings.
Or, select your group and, in the new ribbon that you can select at the top, select the desired setting you wish to change.
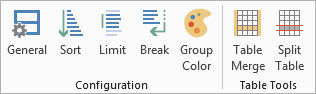
General
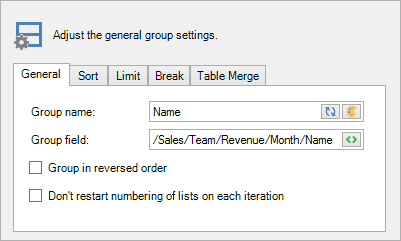
Group name
Give your group a name that will be used to show it in the mapping tab of the pane. You can select the reset button to the right to reset the chart name to the name of the field you're grouping over. Finally, there's the color button, which you can select to change the group box's color in the template.
Group field
The group field is the field that was selected in the data set tab of the XperiDo pane when you clicked the group button. To change this field, select the field button.
Group in reversed order
Enabling this setting reverses the order of the elements in the group.
Don't restart numbering of lists on each iteration
When working with sub-lists (1.a, 1.b, 1.c etc.), enabling this setting ensures that the numbering of the second list continues across iterations in your group. Kind of an obscure setting, but it can be useful in certain situations.
Sort
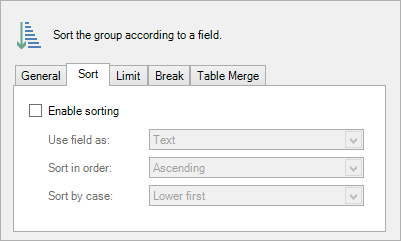
Check the box to enable the group sorting settings.
Use field as
You have to specify what the type of the group field is, as not every type reacts the same way to sorting. For instance, when sorting numbers as text, you'll end up with 1, 10, 2, 3 instead of 1, 2, 3, 10.
The following options exist:
- Text: when your field is a text field (string).
- Number: when your field is a number (integer/float).
- Date: when your field is a date.
- Time: when your field is a time.
- DateTime: when your field is a date and a time.
Sort in order
You can also define the order in which to sort (ascending or descending).
Sort by case
Finally, for text sorting, you can choose how case should be treated by changing the Case-order setting:
- Upper first: uppercase comes before lowercase.
- Lower first: lowercase comes before uppercase.
- Ignore case: lowercase and uppercase letters are treated equally.
Limit
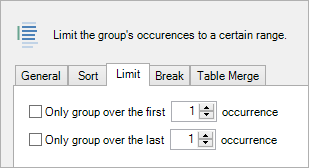
The limit tab is used to limit the number of iterations your group goes through. Check the box before the setting you wish to use, and define the number of iterations you want the group to go through.
Break
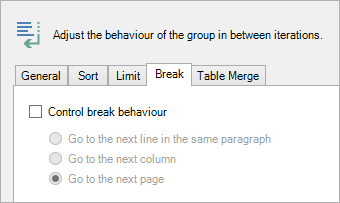
Check the box to control the group's break behaviour by inserting special breaks. This affects the continuity in between the iterations of the group.
- Go to the next line in the same paragraph: the next iteration is placed on the next line, within the same paragraph.
- Go to the next column: the next iteration is placed in the next column. If there is no next column, it will be placed on the next page.
- Go to the next page: the next iteration is placed on the next page.
Note that you can affect the continuity yourself by putting a break symbol in the group box. You can read more about this here. The article is about loops, but it applies to groups as well, in every way.
Table merge
The table merge tab offers a few features that can help you when grouping over tables or table rows. The concept and options are identical to the table merge features in loops, so all the information can be found on that page.