The Data Sets List view displays all Data Sets currently in the environment. This view displays essential information such as names, types, modification dates, and available actions for each Data Set. Administrators and users with appropriate permissions can create, edit, clone, export and delete Data Sets directly from Data Sets List view.
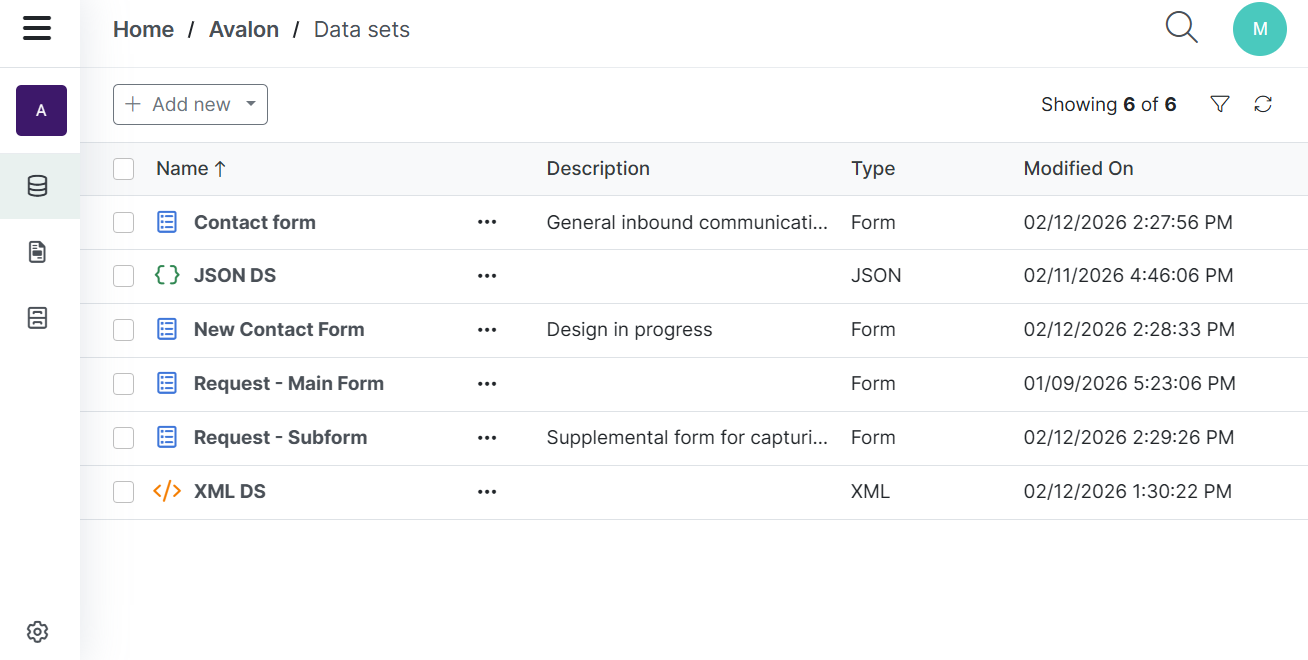
Data Sets List view functions
|
Field |
Description |
|---|---|
|
Name |
Displays the name of the Data Set. |
|
Description |
Displays the optional Data Set description. |
|
Type |
Define the type of Data Set. |
|
Modified On |
Displays the date and time when the Data Set was last modified. |
|
Ellipsis button |
Opens the ellipsis menu that provides access to additional actions. |
|
+ Create |
Opens the Create data set wizard to allow users to create additional data sets. |
|
Export |
Launches the Export wizard to export Data Sets with or without their samples and dependencies. |
Managing Data Sets
Users with the appropriate permissions can manage the Data Sets and their permissions within their project with the following actions: create, edit, clone, and delete.
Create a Data Set
| 1. | In the Data Sets List view, select the +Create button. |
The Create data set wizard displays.
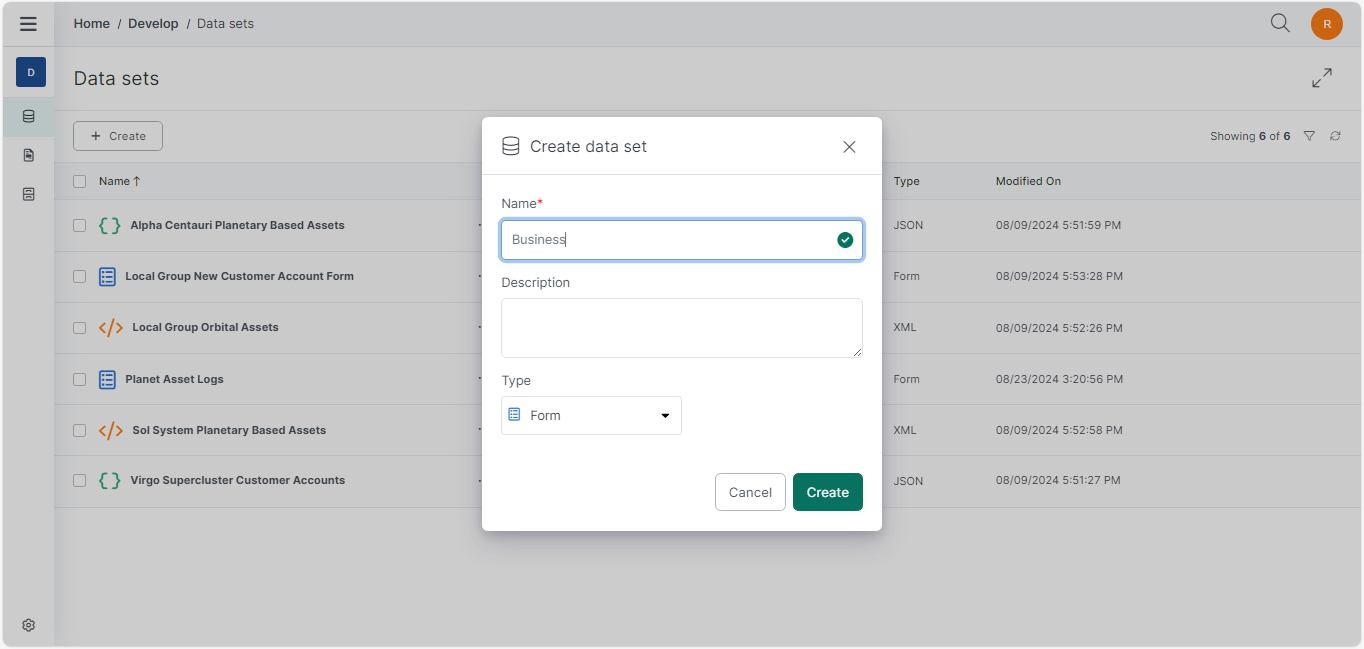
| 2. | In the Name field, enter the name for your data set. |
| 3. | (Optional) In the Description field, enter a description for your data set. |
We recommend adding a Description to your data set so that users can quickly identify when they can clone an existing data set that can be modified to match a new business need.
| 4. | In the Type drop-down menu, select the type Data Set to create. |
| 5. | Select the Create button. |
The success message displays. The Design tab for the new data set displays.
You've successfully created a new data set for your project.
Edit a Data Set
Users can edit Data Sets in two ways: clicking the desired data set in the List view or clicking the Options button for the desired data set in the Data Set List view and selecting Edit.

Users make edits to data sets via the Data Sets Overview Tab or the menu and tab options. They can make the following changes from this view:
| 1. | Change the data set's name |
| 2. | Change the data set's description |
| 3. | Modify the Data Set(s) properties via the available tabs |
Clone a Data Set
When cloning a data set, the system reuses the data from an existing data set. It allows you to make changes to craft a new data set quickly.
Stefan works in the Proxima Centauri a branch office and needs a data set for transporting goods from Proxima Centauri a to locations in the Sol System. He can clone an existing data set and reuse, or modify, it as needed to create schemas and forms.
| 1. | In the Data Set List view, select the Options menu for the data set you wish to clone. |
| 2. | Select Clone . |
The Clone Data Set wizard displays.
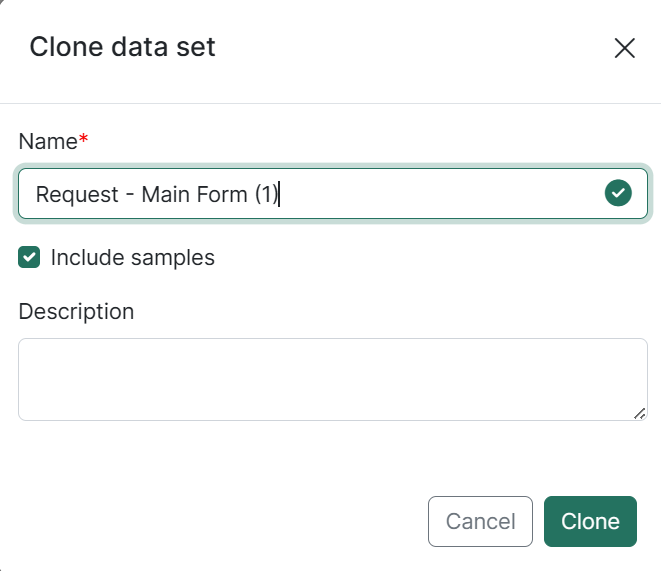
By default, the system automatically reuses the name from the original data set with a parenthetical increment (1).
| 3. | In the Name field, enter a new name for your data set. |
| 4. | (Optional) Select the checkbox for Include Samples. |
| 5. | (Optional) In the Description field, enter a description for your data set. |
| 6. | Select the Clone button. |
A success message displays confirming the data set's successful cloning.
The Edit View for the cloned data set displays.
You've successfully cloned your data set.
Export a Data Set
Users can export data sets, including their samples and dependencies, to maintain data integrity and functionality when transferring them between projects within their Experlogix Documents subscription. This section offers a concise overview of the export process, detailing the steps for exporting items and managing their dependencies.
| 1. | In the Data Sets List view, select the item you wish to export. |
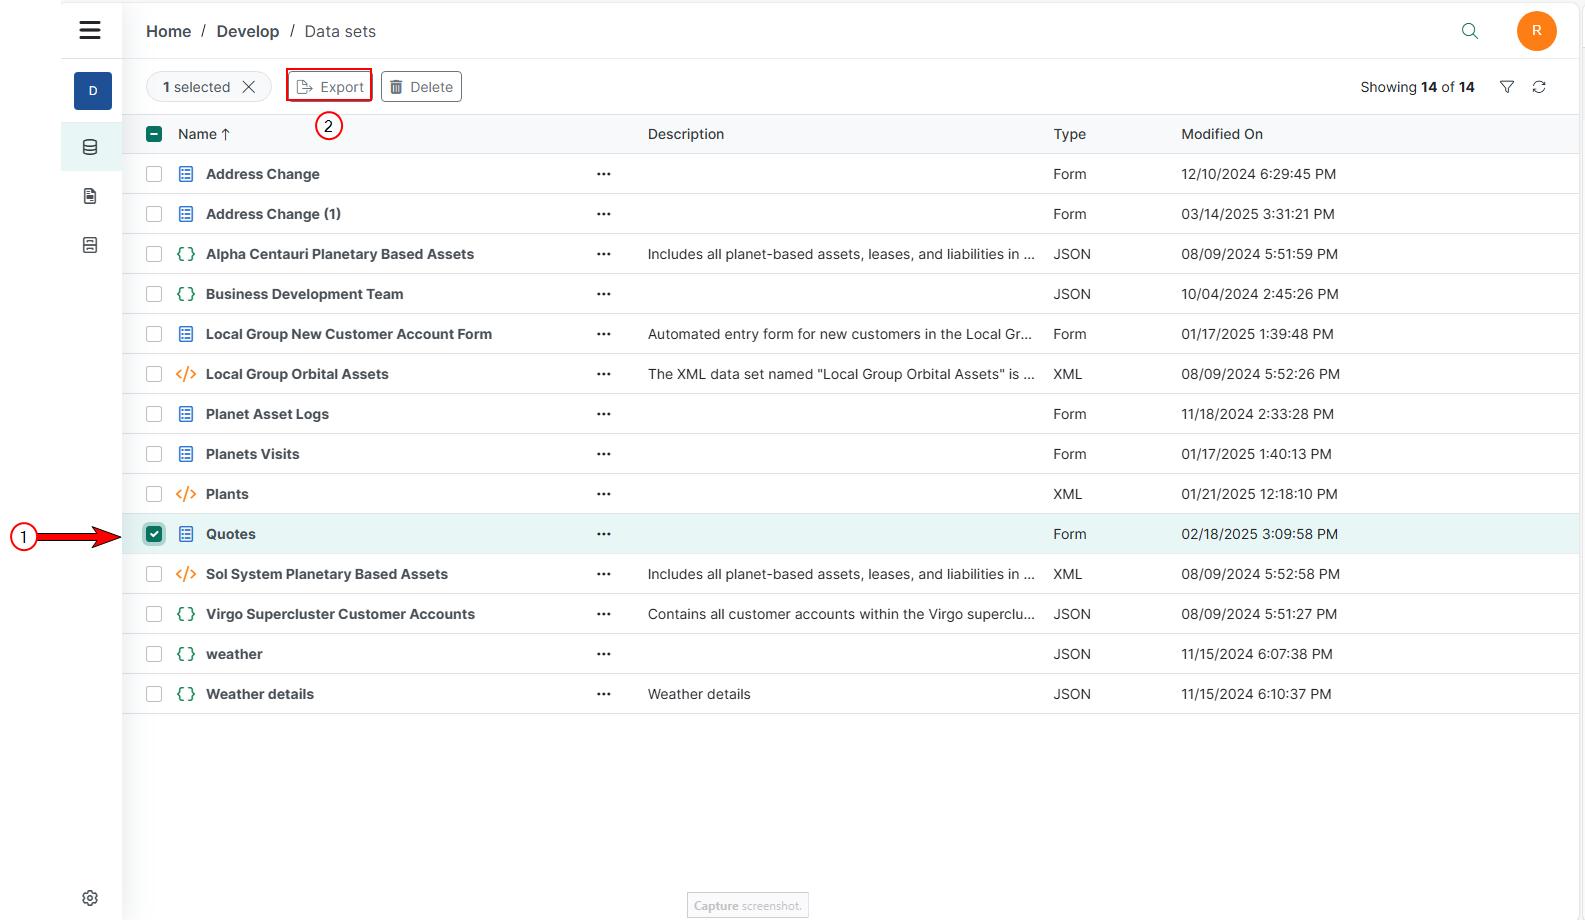
| 2. | Select Export to initiate the export process. |
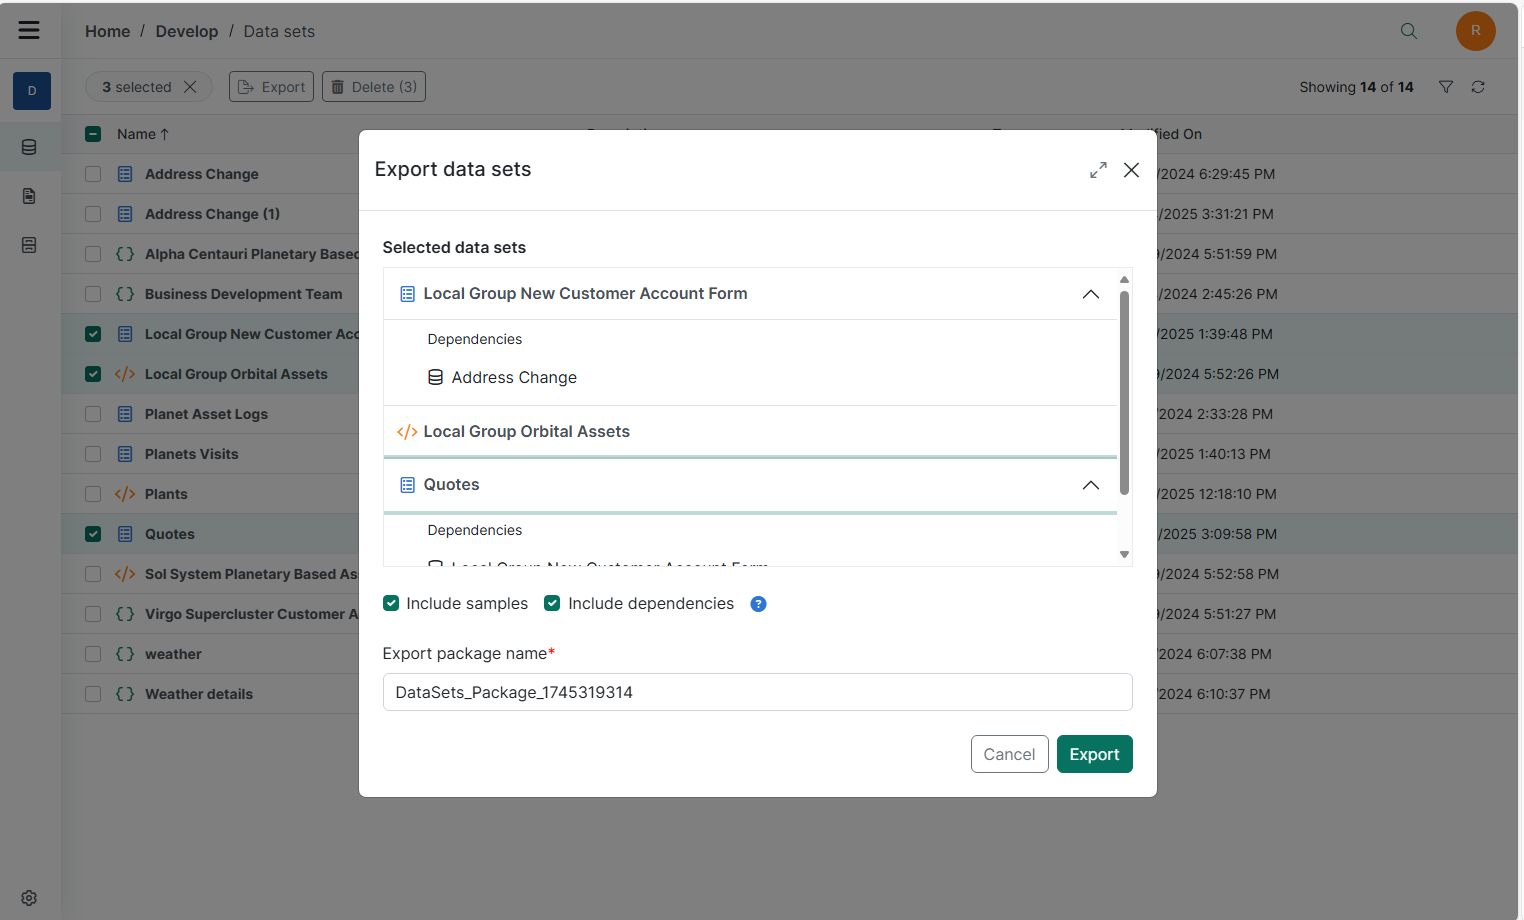
A dialog displays options for dependencies and samples of the selected item.
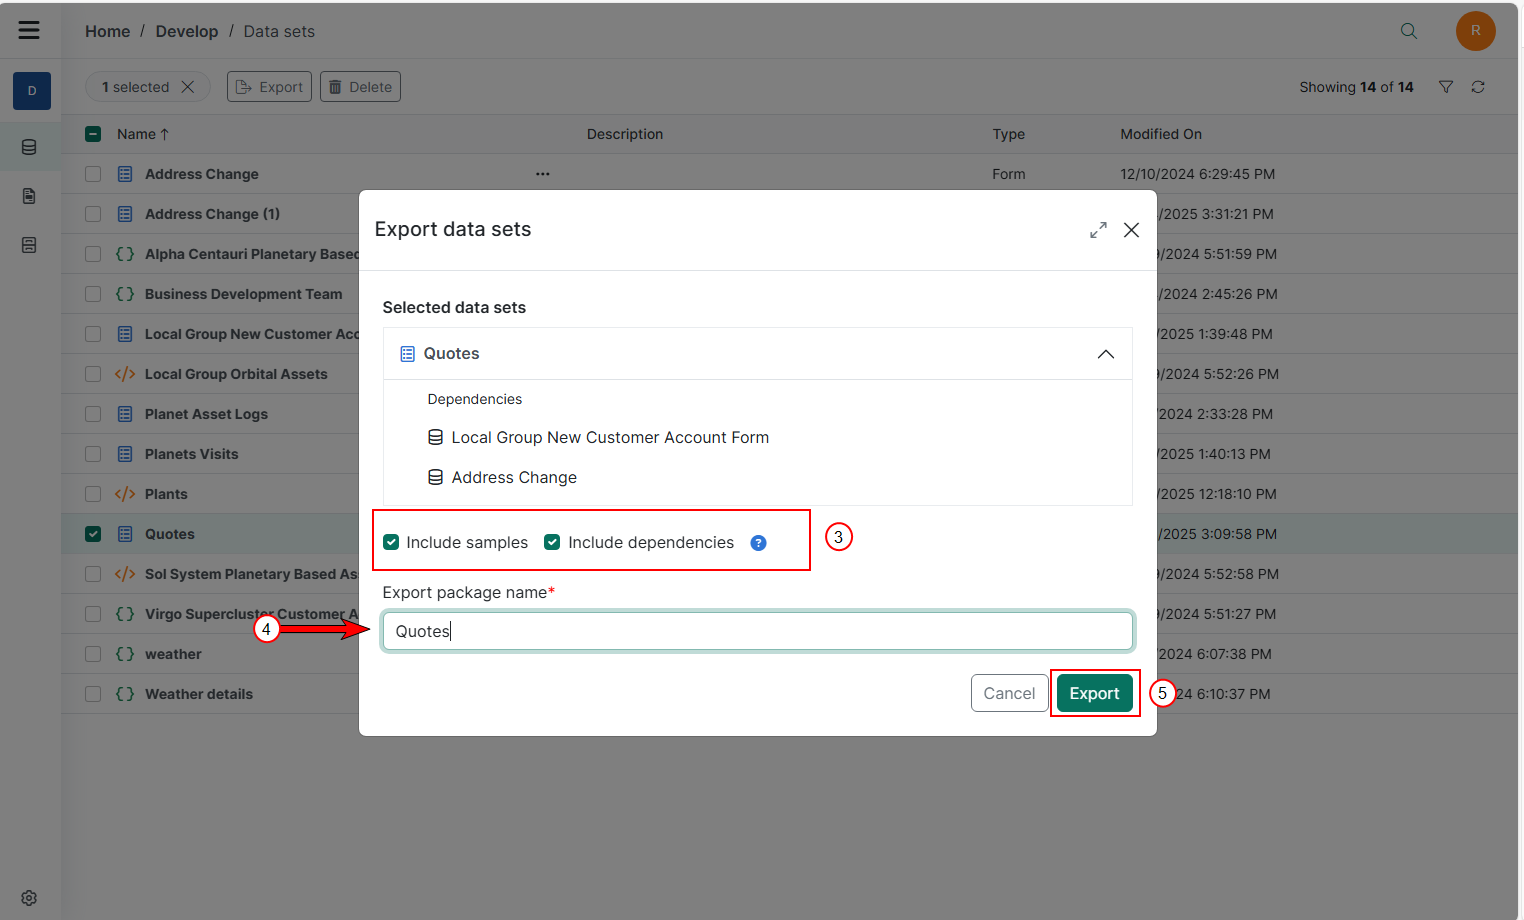
| 3. | Select Include samples to add sample data to the export, and/or select Include dependencies to include all dependencies of the selected item. |
| 4. | Rename your Export package name if you want. |
| 5. | Select Export. |
The success message displays, and the export package is downloaded.
Import a Data Set
Users can import data sets from Project Settings, with the option to include or exclude their samples and dependencies.
For detailed information about importing packages, please refer to the Project Settings: Import